Mt Whitney Hike
The Mt Whitney hike is one of the classic bucket list adventures in the U.S. At 14,505 feet, Mount Whitney is the highest peak in the lower 48, and you can reach the summit on a regular trail, no technical climbing required. To do it safely, you’ll need to plan ahead for permits, altitude, weather, and train for a long, demanding day. This guide walks you through everything you need to know to hike Mt Whitney with confidence.
Hike Stats
- Total Distance
- 21.5 miles
- Time
- 12-16 Hours
- Total Climbing
- 6500 feet
- Difficulty
- Very Hard
- Crowds
- Moderate
- Dogs
- No Dogs
- Gear
- What I Use
- Weather
- Latest Report
How to Hike Mt Whitney
Here's the plan for hiking Mt. Whitney.
- Before you go, you'll need to score a hard-to-get permit and then book travel.
- Train for the long distance and altitude with the gear you'll use.
- Plan your hike day and acclimatize before your hike.
- Hike 21.5 miles and climb 6,500 feet (that’s about 1.25 vertical miles). Be ready to turn back if the weather or your body isn’t cooperating.
Mt Whitney Hiking Options
| Option | Pro | Con |
|---|---|---|
| Day Hike | More Permits Available & Lighter Pack | Long Tough Day |
| Overnight (1+ Nights) | Less Altitude Issues | Heavier Pack & Tougher Permits |
| Other Routes | Easier Permits | Tougher & Not as Beginner Friendly |
- Day Hike - Most hikers start very early, often between 2 a.m. and 5 a.m., to reach the summit before afternoon thunderstorms. It’s a demanding push even for experienced hikers. Gaining over a mile of vertical in one day makes acclimatization tough, and you may need to turn back if altitude sickness sets in. Fit hikers usually finish in 10–14 hours, though some take close to 24.
- Overnight / Multi-Day Hike - Breaking the trail into two or more days makes the hike more manageable and enjoyable. Most people camp at Outpost Camp (10,365 ft) and/or Trail Camp (12,000 ft), giving your body more time to adjust to altitude and letting you tackle the summit on fresher legs. You’ll haul a heavier pack on the way up, but can also leave it at camp and carry a lighter day pack just for the summit push. Typical itineraries range from 2 to 3 days.
- Other Routes - Whitney can also be reached from longer approaches like the John Muir Trail, High Sierra Trail, Onion Valley, or Cottonwood Lakes. These hikes are generally longer, harder, and meant for experienced backpackers or climbers. If this is your first time hiking Mount Whitney, it’s best to stick with the main trail.
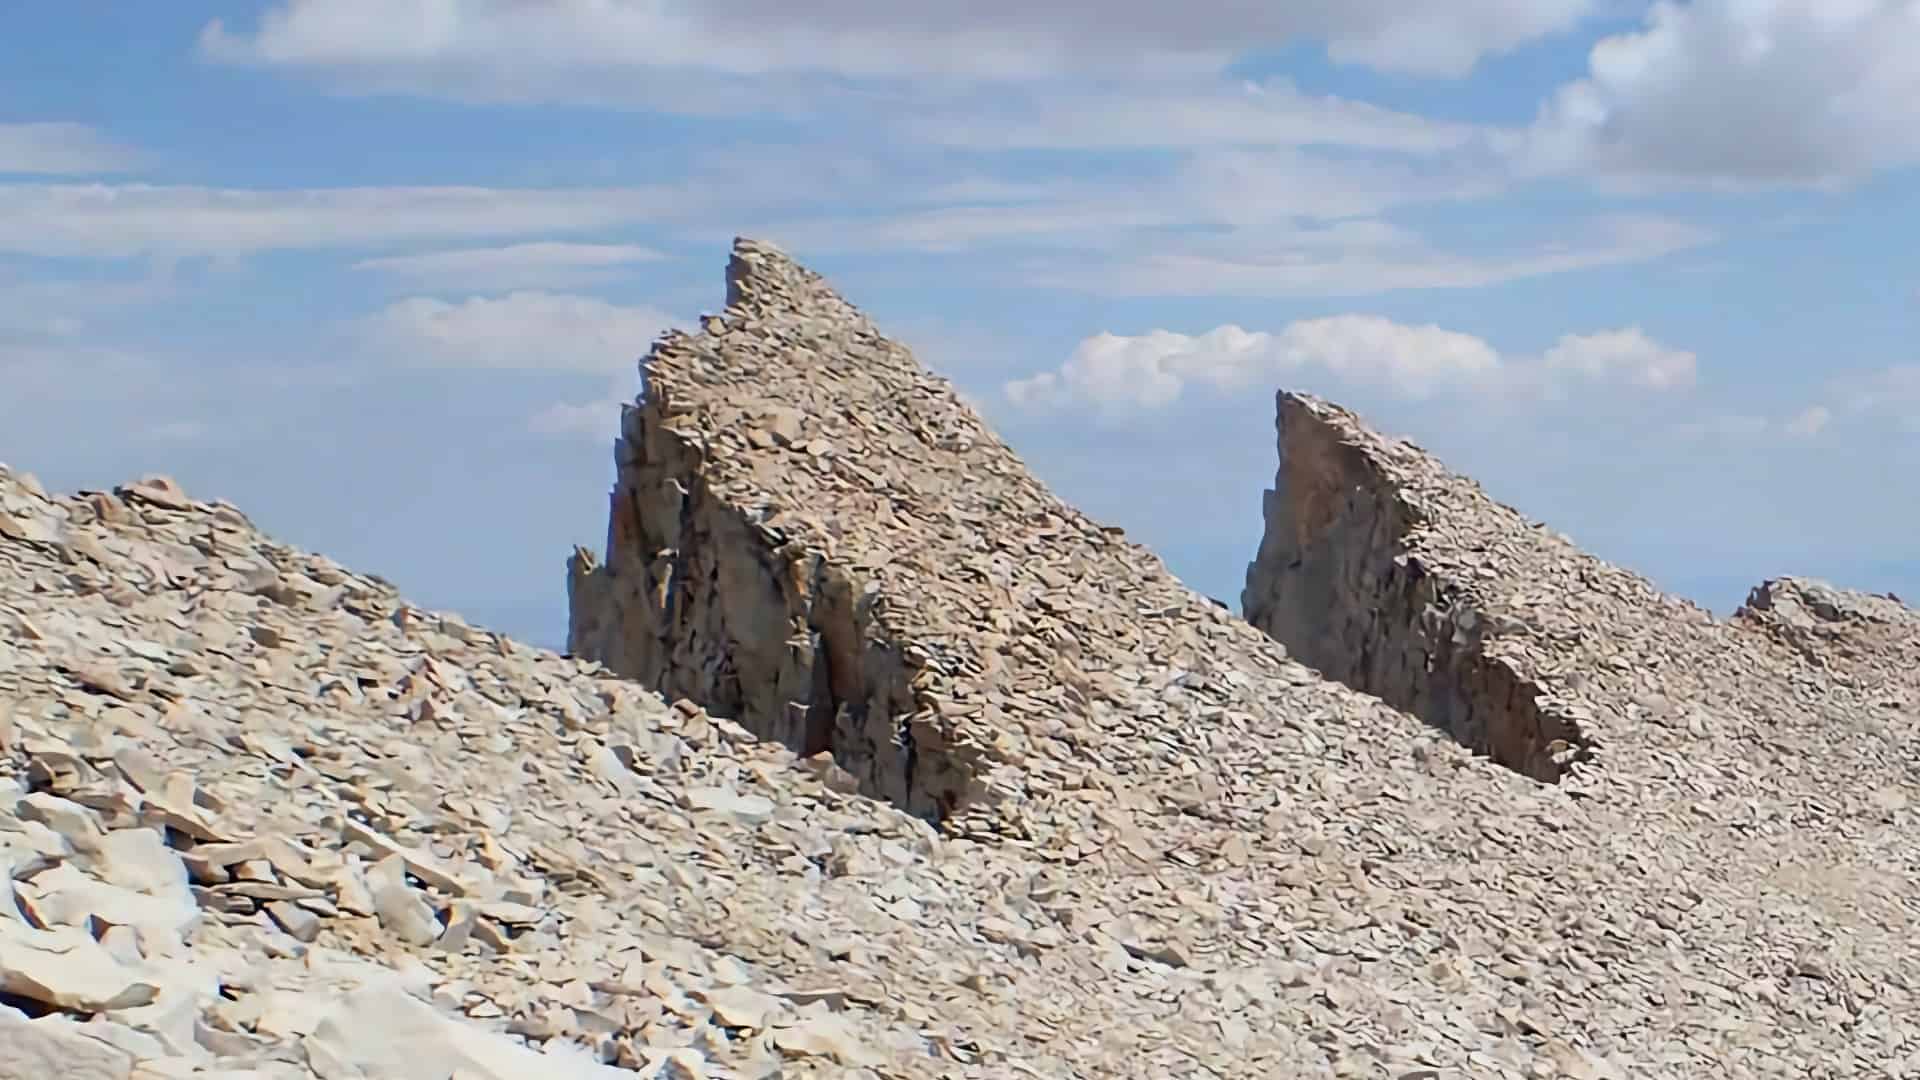
Mt Whitney Trail vs. Mountaineer’s Route
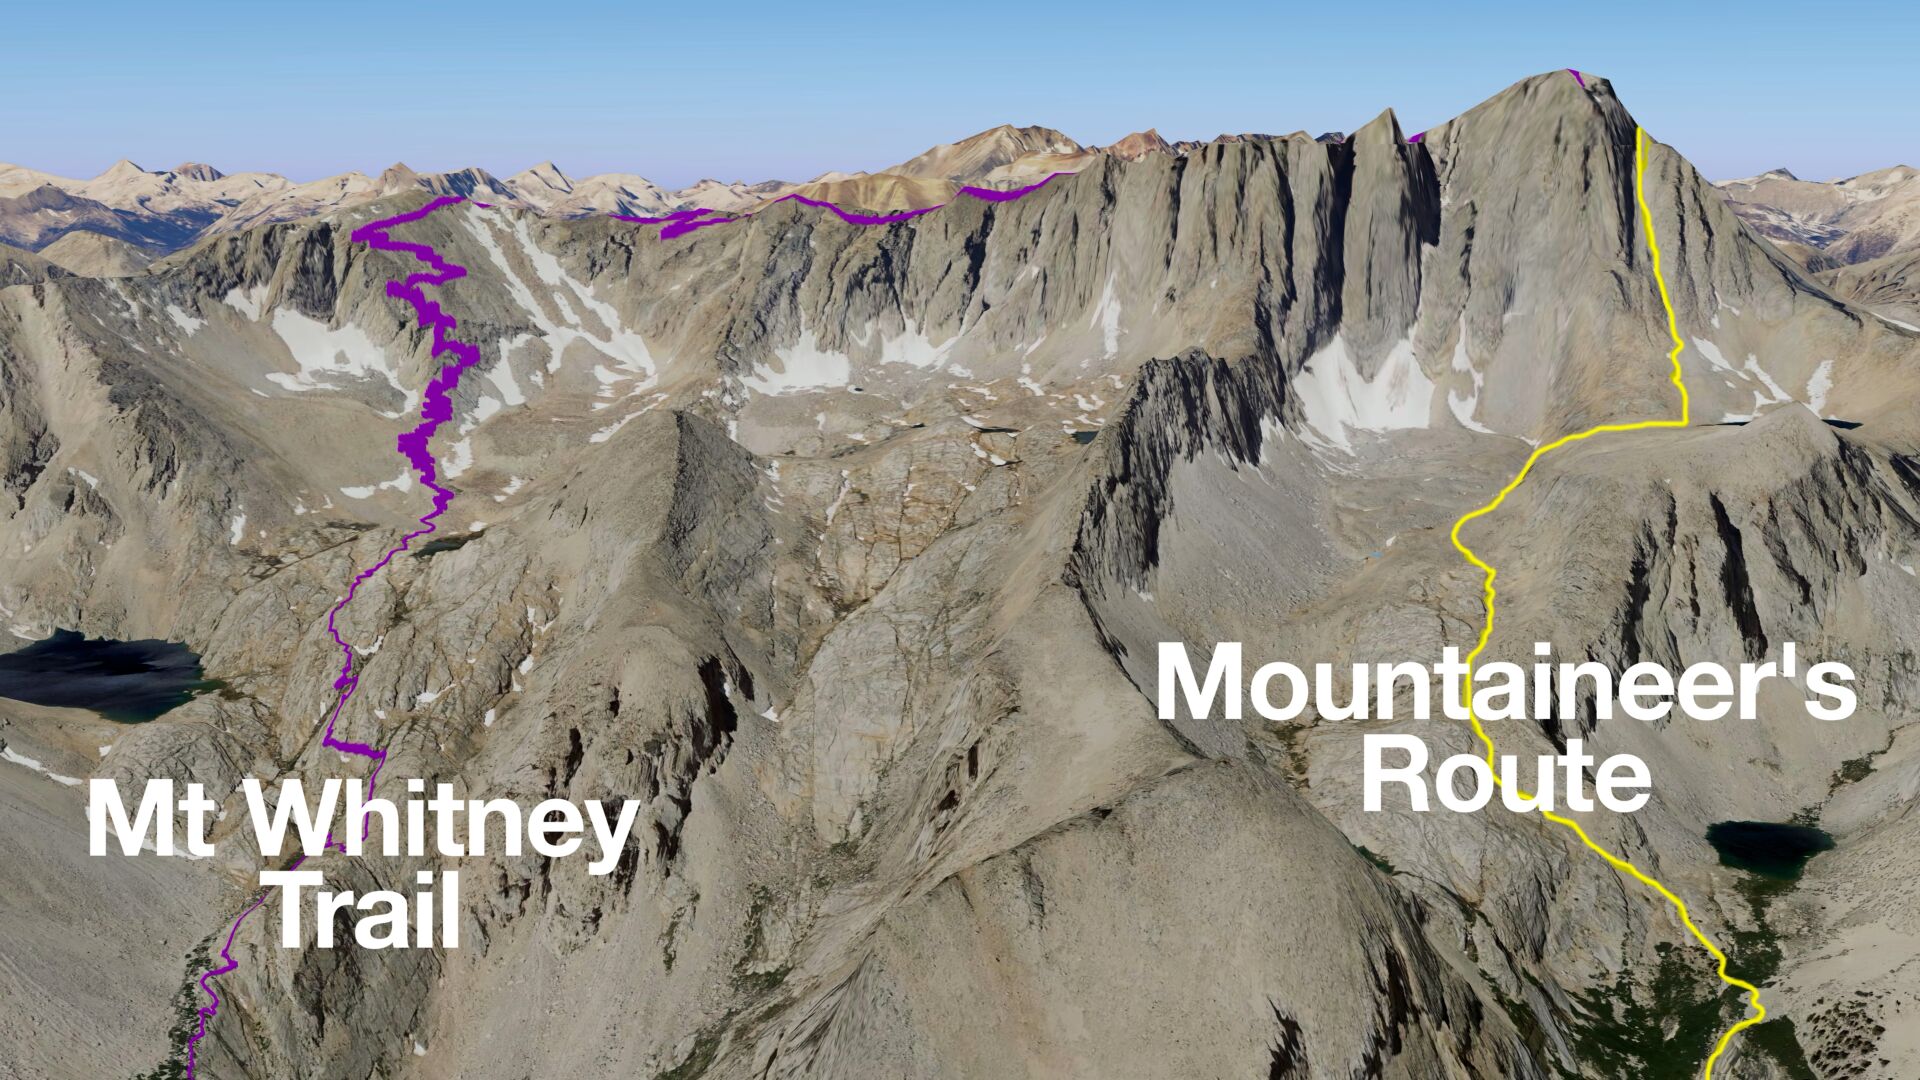
The Mt Whitney Trail is a Class 1 trail, well defined, well marked, and without technical climbing. That’s the hike I cover in this guide. The Mountaineer’s Route, which starts at the same trailhead but veers north, is a Class 3 climb. It has steep scrambles, loose rock, and real fall danger. The risks start well before the steep final push to the summit, with sections like the Ebersbacher Ledges where people have died. If you want to try the Mountaineer’s Route, go with an experienced guide.
When to Hike Mt Whitney
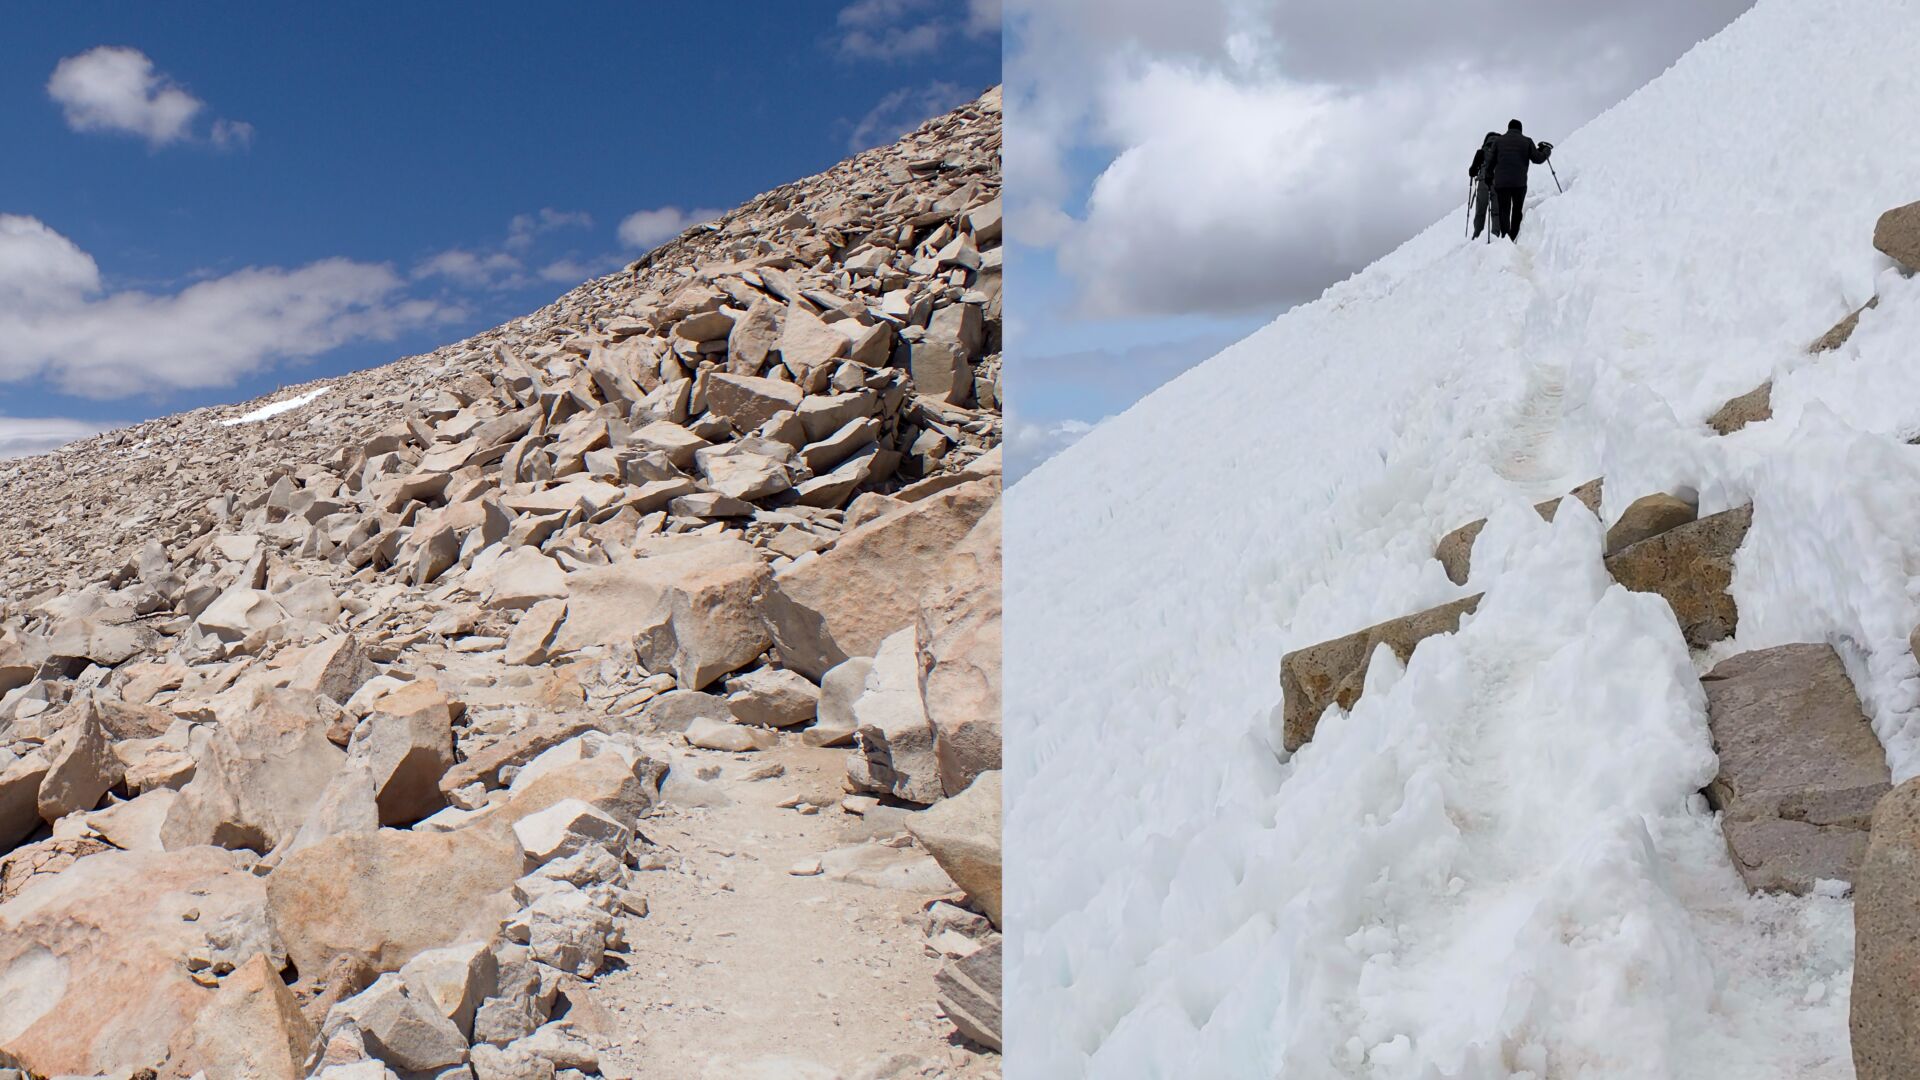
- Snow cover on the trail depends on the winter snowpack. Even in August or September, you may find patches of snow and ice. After dry winters the trail can be clear of snow in June.
- If you plan to hike early in the season, have experience with microspikes and an ice axe, and always check recent trip reports on AllTrails, the Mt Whitney Facebook Group, and Whitney Zone on what to expect.
- It can snow in summer on Mount Whitney, but it rarely sticks for long because of warmer daytime temperatures.
- Thunderstorms are common in summer afternoons, so plan to reach the summit before noon to give yourself the best chance of avoiding them.
Mount Whitney Permits
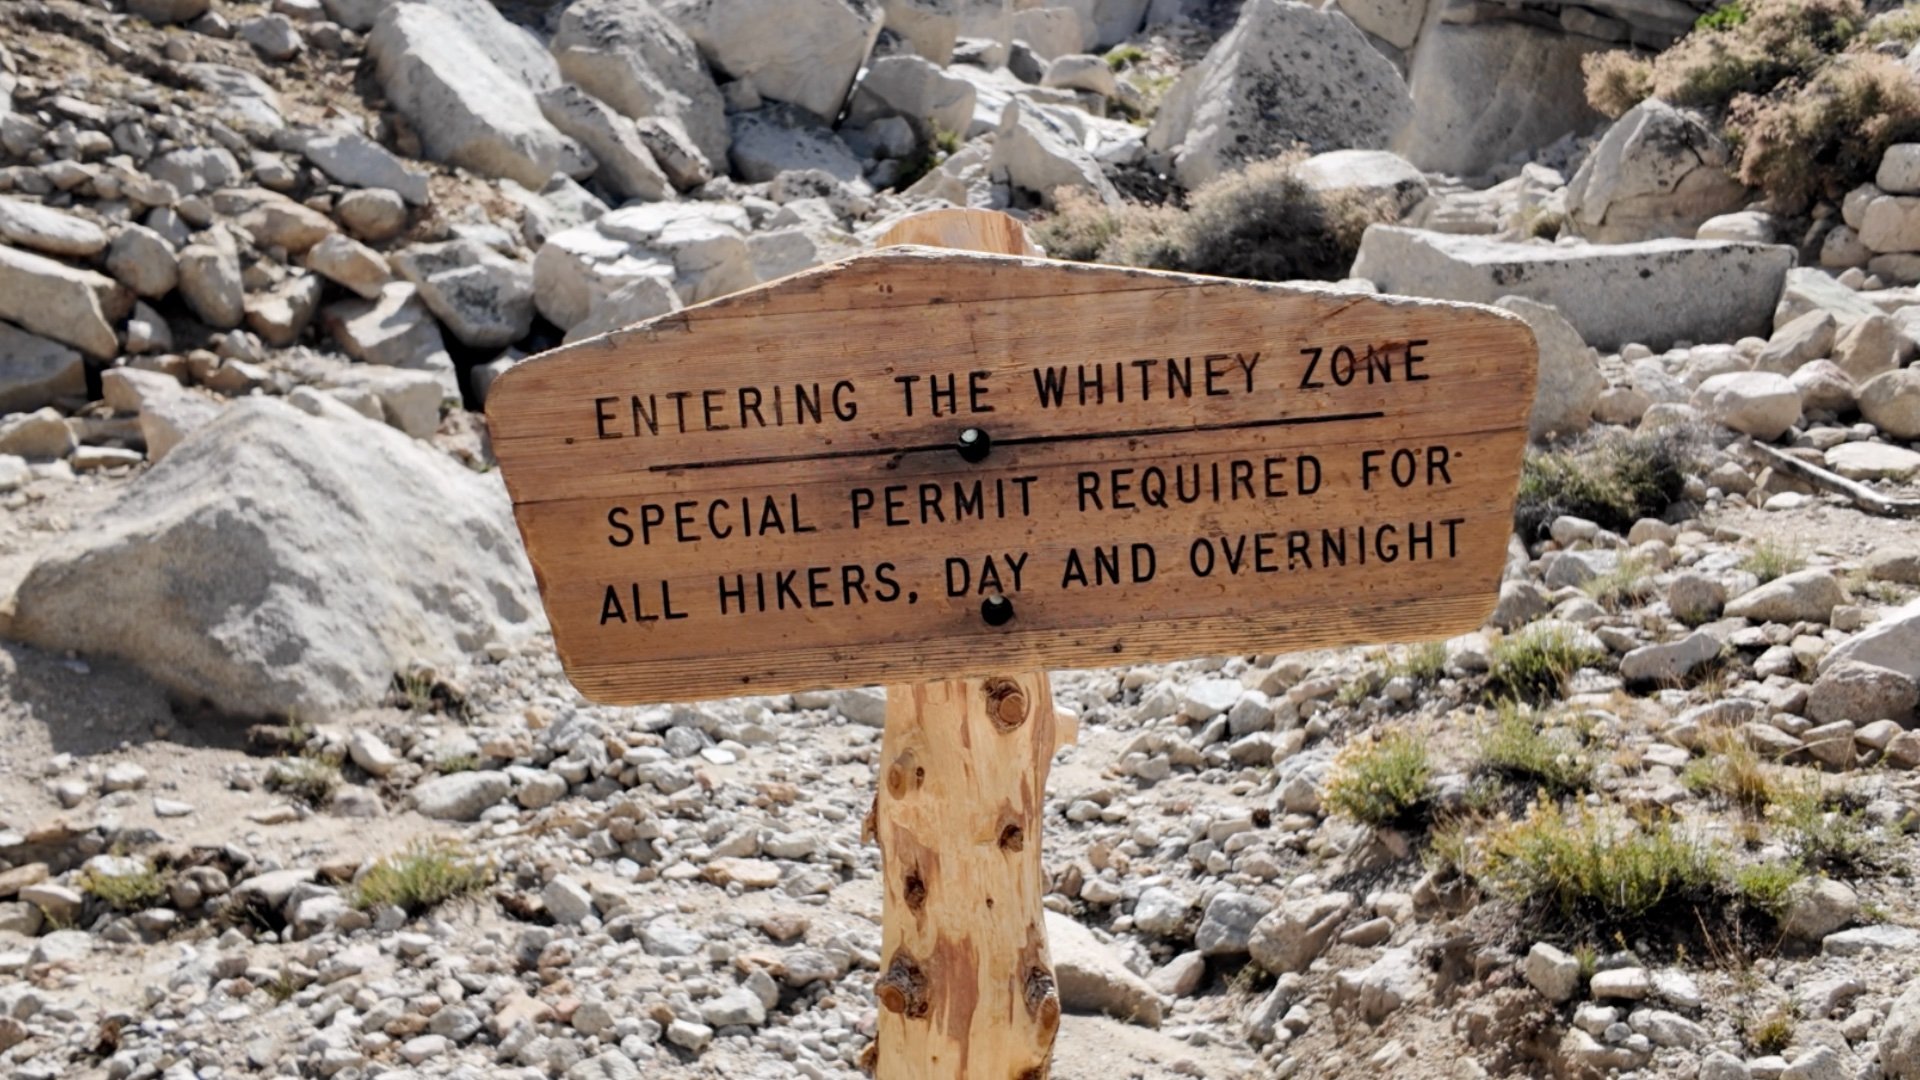
Every hiker needs a permit to enter the Whitney Zone, which starts at the boundary past Lone Pine Lake, even for a day hike. Permits are issued under a quota system from May 1 through November 1:
- 100 daily day hiking permits
- 60 overnight permits.
Outside of that time you still need a permit, but they are unlimited (and conditions often dangerous).
There are several chances to get a permit, and that process starts months before the season opens. The official page to register, along with all the official dates is at Recreation.gov. Here are the key milestones.
| Date | Description |
|---|---|
| Feb 1-Mar 1 | Apply for up to 15 dates to hike or backpack |
| March 15 | Lottery results announced |
| April 21 | Pay for permit or lose it |
| April 22 | Unclaimed lottery spots released |
| May 1 - Nov 1 | Cancelled reservations released on website daily if available |


Permit Tips
- Midweek dates have better odds than weekends.
- Late season (Sep–Oct) is less competitive, though the snow risk is higher.
- Check daily for last-minute cancellations or use a service like Outdoor Status to do it for you automatically. If you have a permit you can't use, cancel it and maybe you'll help another hiker out. You can also check the Facebook Whitney Permit Share group , Whitney Permit Alerts Group on Facebook, and Whitney Zone Forums.
- When you pay for your permit, make sure to check the no-show cutoff. If you don't print your permit before the cutoff your permit is cancelled and released!
- If you want to pick up one of these open no-show permits, call the Eastern Sierra Visitor Center to check on the availability.
- You have to print your permit (I know...), sign it, and carry it with you. I put mine in a gallon ziplock bag along with my trail map. If you don't have a printer handy, you can get it printed at the Eastern Sierra Visitor Center.
- Day hike passes are midnight to midnight and include parking at the trailhead.
- If you're hiking with a group on one permit, they generally have to stay together and everyone should have a copy of the permit.
Thinking of hiking without a permit? Rangers do check. If they stop you, expect to be turned around and maybe escorted back to the trailhead, which takes a ranger away from helping someone in distress. You can also be cited and fined.
Planning Your Mt Whitney Trip
Once your permit date is locked in, the next step is planning how to get to Mt Whitney and where to stay. The trailhead is remote, and you’ll also want to build in time to acclimatize. Coming in from sea level and hitting the trail right away makes it much less likely you’ll reach the summit.
Sample Itineraries
Everyone’s schedule is different, but the more days you can spend in the Eastern Sierra, the better your odds of acclimating and having a safe hike. The rule of thumb is “climb high, sleep low,” spend time at altitude during the day, then drop lower at night to rest. There’s evidence that sleeping high can help acclimatization, but it often comes with poor sleep. Sleeping lower usually means better rest and recovery.
It also helps to hike the legs at altitude a bit beforehand, then give your body time to rest and rebuild before Whitney. For Mt Whitney, that means using places like Horseshoe Meadows, Cottonwood Lakes, or Whitney Portal to get used to the thinner air instead of blasting straight from sea level to 14,505 feet in one go. Here are a few common approaches:
2-Day Plan
- Day 1:
- Visit the Eastern Sierra Visitor Center
- Short and easy hike around at Cottonwood Lakes Trailhead (~10,000 ft)
- Overnight in Lone Pine
- Day 2: Hike Mt Whitney
3-Day Plan
- Day 1:
- Hike to Cottonwood Lakes (10–12 miles, ~10,000 ft)
- Overnight in Lone Pine
- Day 2:
- Rest, nap, hydrate, and hang out at Whitney Portal or Cottonwood Lakes
- Visit the Eastern Sierra Visitor Center
- Overnight in Lone Pine
- Day 3: Hike Mt Whitney.
4-Day Plan
- Day 1:
- Hike White Mountain Peak (14,246 ft) or another high-altitude hike
- Overnight in Lone Pine
- Day 2:
- Rest, nap, hydrate, and hang out at Whitney Portal or Cottonwood Lakes
- Overnight in Lone Pine
- Day 3:
- Visit the Eastern Sierra Visitor Center
- Short hike around at Cottonwood Lakes Trailhead (~10,000 ft)
- Overnight in Lone Pine
- Day 4: Hike Mt Whitney.
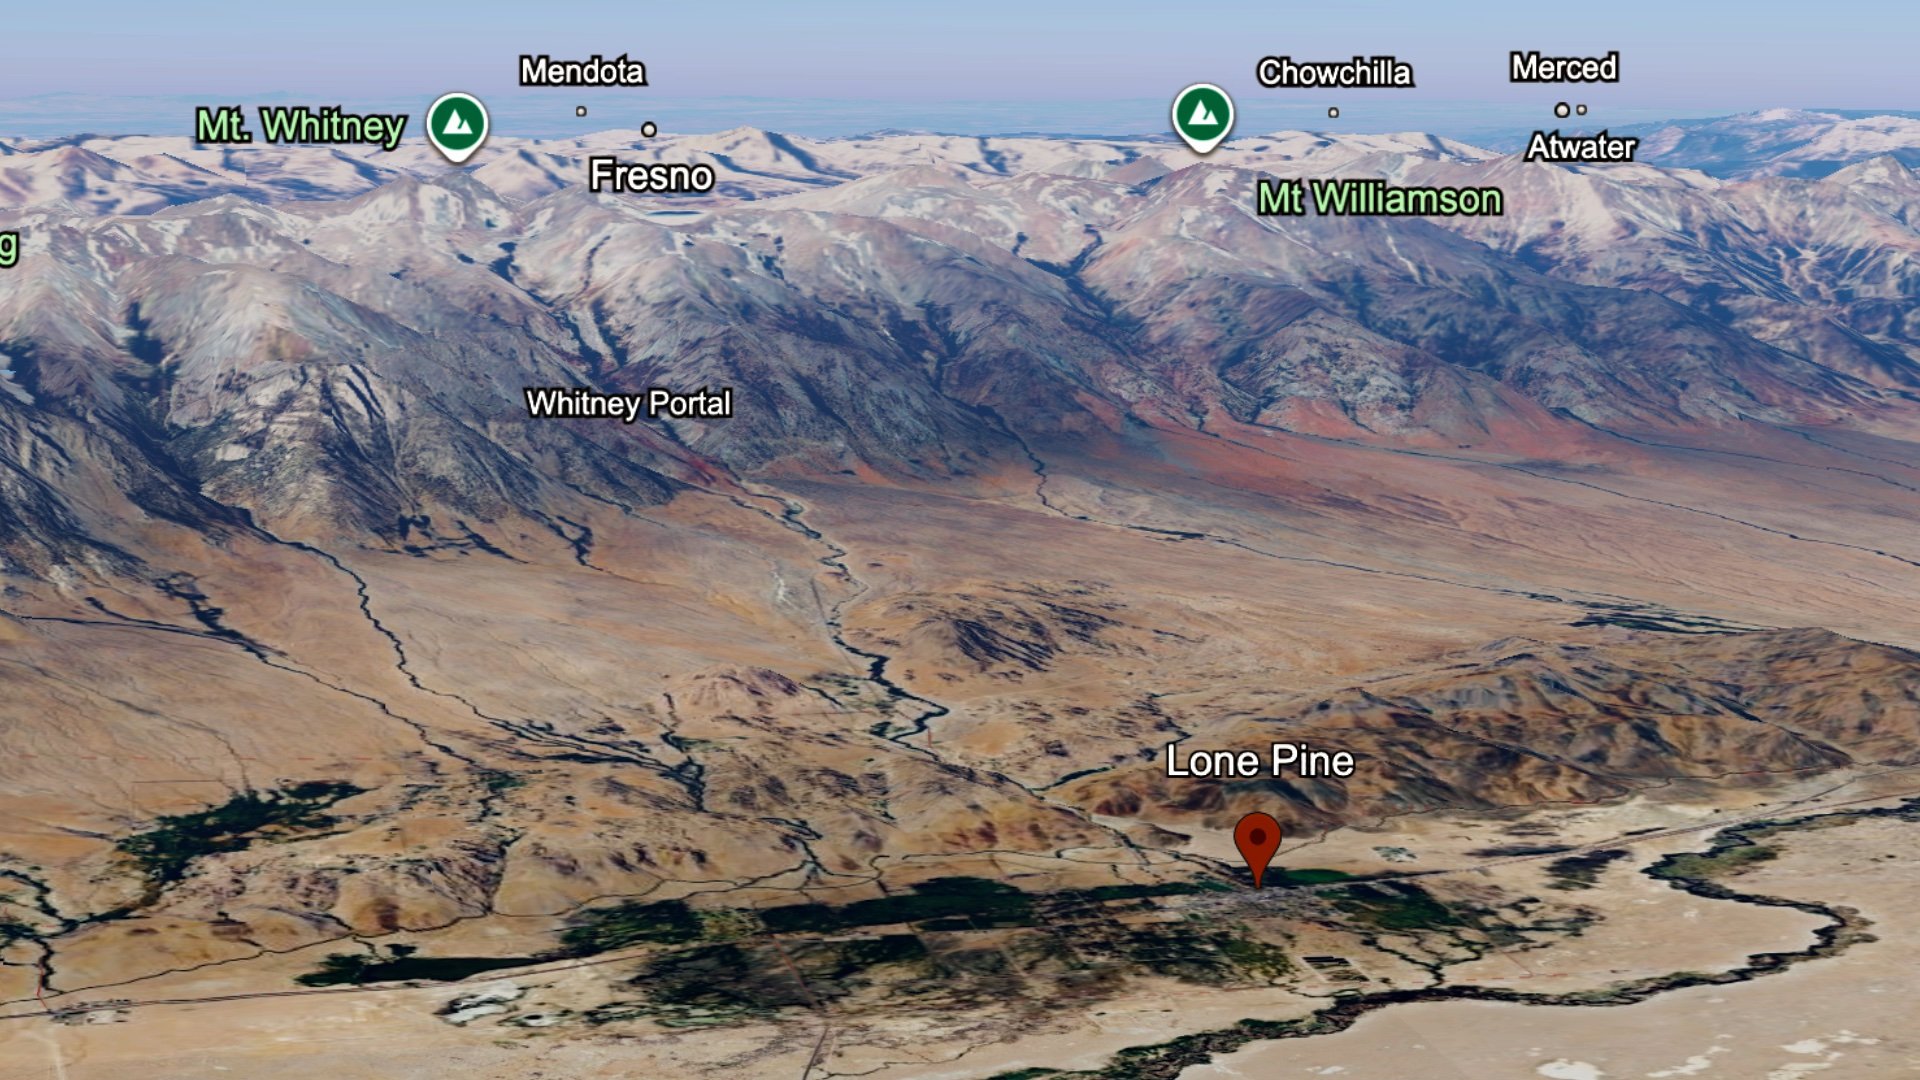
Closest Airports and Cities
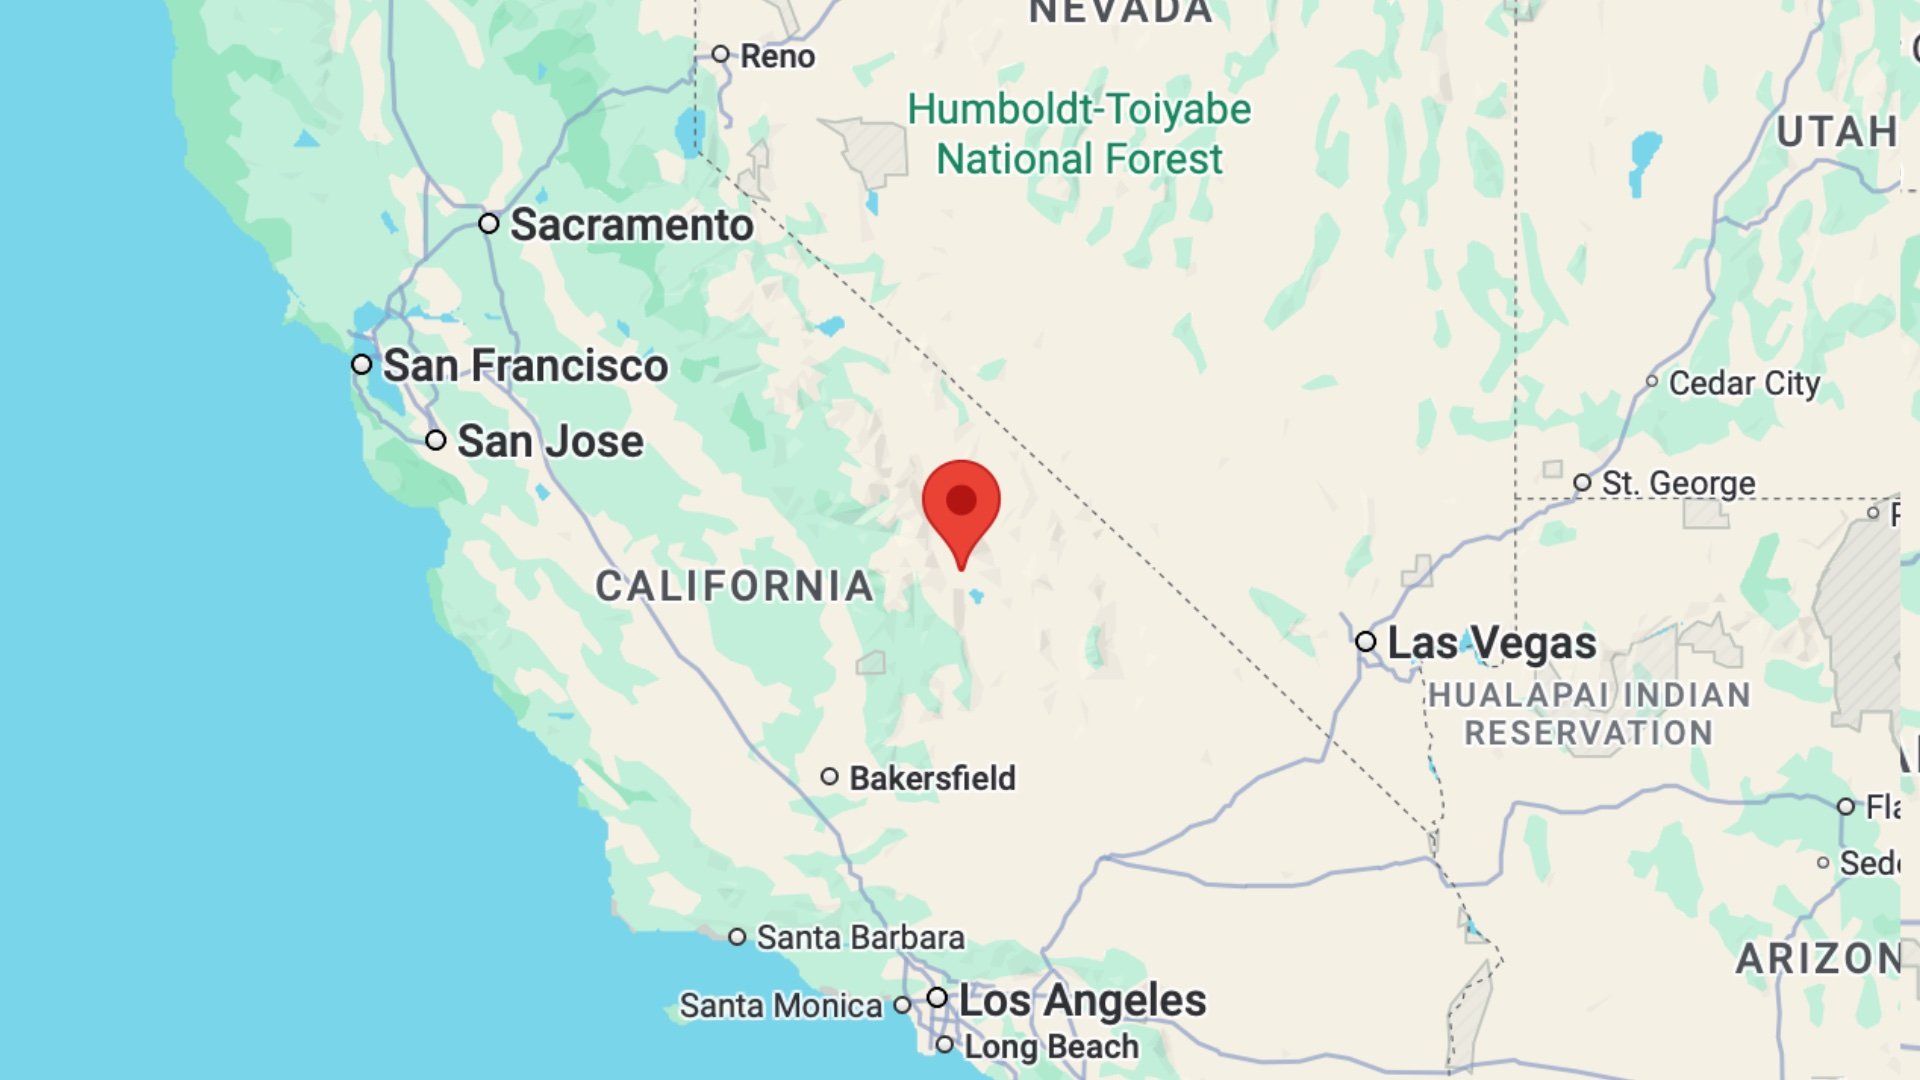
There are no major airports close to Mt Whitney, so plan some driving. All the roads to Lone Pine and the Whitney Portal trailhead are paved, and any standard rental car will work.
| Airport | Drive Time | Notes |
|---|---|---|
| Los Angeles (LAX) | 3.5–4.5 hours | Lots of flight options |
| Las Vegas (LAS) | 4 hours | Affordable flight options |
| Reno (RNO) | 4.5–5 hours | Affordable flight options |
| Fresno (FAT) | 5 hours | Good if visiting Yosemite or Sequoia |
| San Francisco (SFO) | 6.5 hours | Lots of flight options |
| Sacramento (SMF) | 6 hours | Alternative option |
| Bishop (BIH) | 1 hour | Small and limited |
| Mammoth Yosemite (MMH) | 1.5 hours | Small and limited |
| Ontario (ONT) | 3.5–4 hours | Quieter alternative to LAX |
Where to Stay
Most people do one of two things before their Whitney hike: stay in a hotel or camp nearby. Each has its pros and cons. Personally, having done both, I find that staying in a hotel makes it a bit easier for me to focus on the hike and get good rest as I acclimatize.
Hotels and Lodging

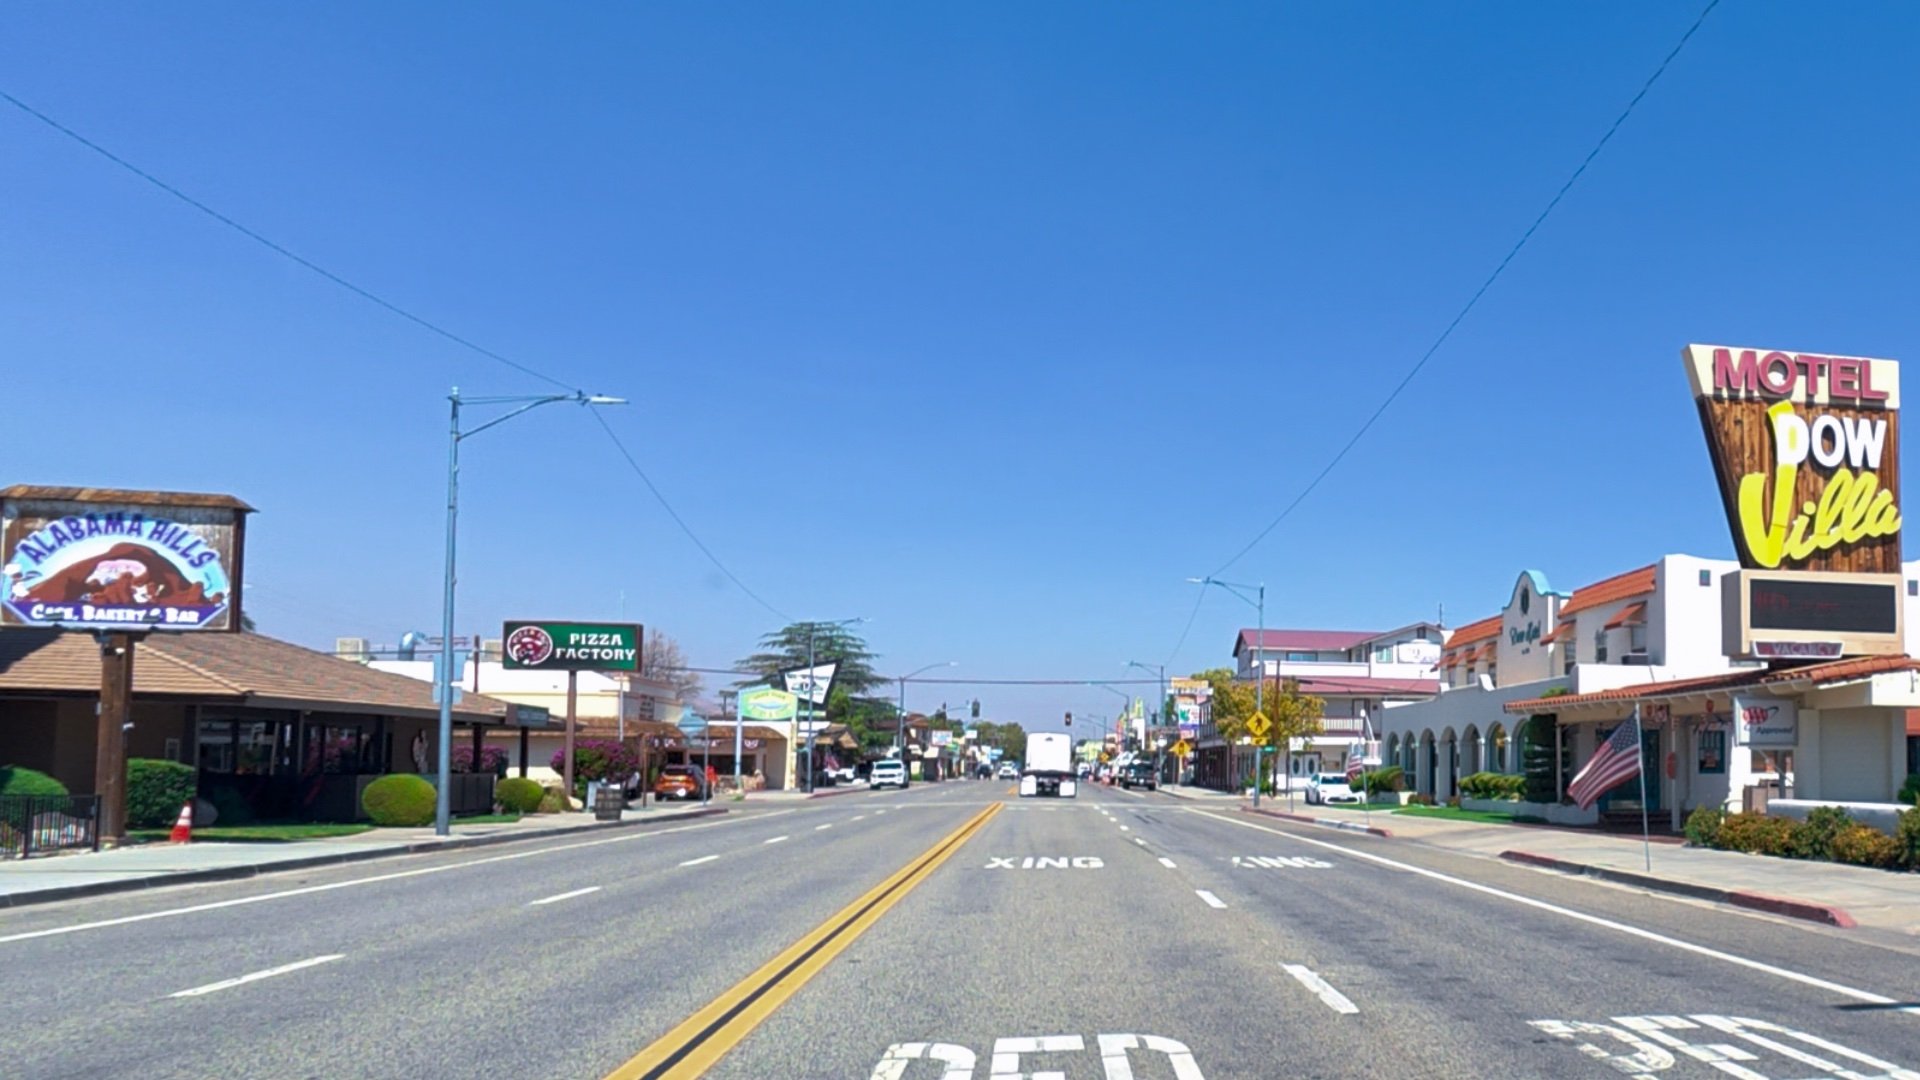
- Lone Pine (~3700 ft) 15 minutes away from the trailhead, has a couple of chain hotels, a hostel, several independent motels, and a few Airbnbs. My go-to is the Best Western, which is easy to book, has large rooms, friendly staff, and is clean.
- Independence, CA (~3900 ft) is about 15 minutes north and also has a few small motels if Lone Pine is full.
Camping

- Whitney Portal Campground (~8300 ft): Closest option, right at the trailhead. Very popular so book as far in advance as possible. Toilets, water, but no showers. If you want to be as close as possible to the trailhead when you start, this is the spot.
- Lone Pine Campground (~5800 ft) Between Lone Pine and the Portal, smaller camp with some walk-up, some book in advance.
- Cottonwood Lakes Walk-In Campground (~10,000 ft): This is a great place to acclimatize and hit Cottonwood Lakes. Technically the campground is just for hikers who are going to hike the Cottonwood Lakes Trail.
- Alabama Hills BLM Land (~4500 ft) This stunning area used to be a free-for-all, with camping allowed almost anywhere. As crowds grew it got trashed. In recent years it was designated a National Scenic Area and now camping is only allowed in established campgrounds.
- If you need a shower while camping, you can pay a few bucks at the Mount Whitney Portal Hostel in Lone Pine.
Check the bear regulations at your campground and use bear boxes if available. Bears have broken into vehicles at Whitney Portal to get at scented items like gum. Take it seriously.
Town Services in Lone Pine

- Lone Pine is small, so set expectations accordingly. There’s a small supermarket, a few gas station convenience stores, and some casual restaurants (burgers, pizza, Mexican).
- No big-box stores. If you need serious resupply, you’ll have to drive farther toward Ridgecrest, CA, Fresno, or Reno.
- The Eastern Sierra Visitor Center, just south of town, sells maps and some limited hiking gear. There are also a few small outfitters in Lone Pine, but don't expect anything like REI or Bass Pro.
- If you have time, visit the Museum of Western Film History. Lots of old films were shot in the nearby Alabama Hills.
- Book early, Whitney Portal and Lone Pine accommodations often sell out months in advance, especially in peak season. Lone Pine is also a popular stop for Highway 395 road trips through Yosemite, Sequoia, and Death Valley.
Training for Whitney

There are no secrets or hacks for training to hike Mt Whitney. You're simply building your body up to hike 21.5 miles with 6,500 feet of climbing. The more time you have to gradually build up to that level of mileage and climbing, the easier it will be for you and your body. If you want to build to the full 21.5 miles, you can, but most people do fine training up to a level just below that (18-19 miles, 5-6k).
Plan A: You Have Mountains Nearby
- Hike real trails and add about 1 mile and 500 feet of climbing per week.
- Build up to 18–19 miles with ~5,500 feet of gain. That puts you in range for Whitney’s 6,500.
- You can also hike with a weighted pack during the week.
Plan B: You Live in Flat Country
- Since you can’t train on real uphills, focus on matching the hiking time. Build gradually until you can handle 12 hours of hiking. Start from where you are now and add 30 minutes on every week until you reach the full 12 hours.
- Use a weighted vest or pack (5–10% body weight). Wear it for the first half to two-thirds of your long session to mimic the climb, then take it off for the “descent.”
- You can also mix in a treadmill at 12% incline (or a StairMaster), it's a decent match for Whitney’s average grade.
- Cap treadmill or StairMaster sessions at about 3 hours to stay sane. If you can do 3 hours at 12%, start nudging the incline higher (15–17%) or sprinkle in short blocks at 20% to simulate steeper sections.
- On longer days, mix your methods. For example: 4 hours outdoors with a vest, 3 hours on the treadmill, then 5 hours flat walking to simulate the downhill.
- If you live in a flat area, consider traveling to do a mountain hike every month. Doing an actual hike that matches your training plan for the week. The best training for hiking uphill is hiking uphill.
More Advice

- Train with the same pack, shoes, and poles you’ll use on Whitney.
- Strength train 2–3 times a week. Basic lifts (squats, lunges, step-ups, deadlifts) build strength for the climb and especially help protect your joints on the long downhill.
- Stick to one long workout (your hike) a week. Give your body time to recover.
- One-hour walks are a great way to recover while staying active and outside during the week.
- Stretch or do mobility work after every long hike to recover faster and stay limber.
- Running or cycling is excellent for building your aerobic base. If you can comfortably run a marathon or ride a century, you’ll have the fitness to make Whitney feel more manageable.
- Mix in one HIIT workout a week to get your heart rate up, this improves how efficiently your body uses oxygen.
- Take a rest week before Whitney to let your body recover.
- Do a shorter warm-up hike a day or two before your Whitney date.

Planning a Whitney Overnight

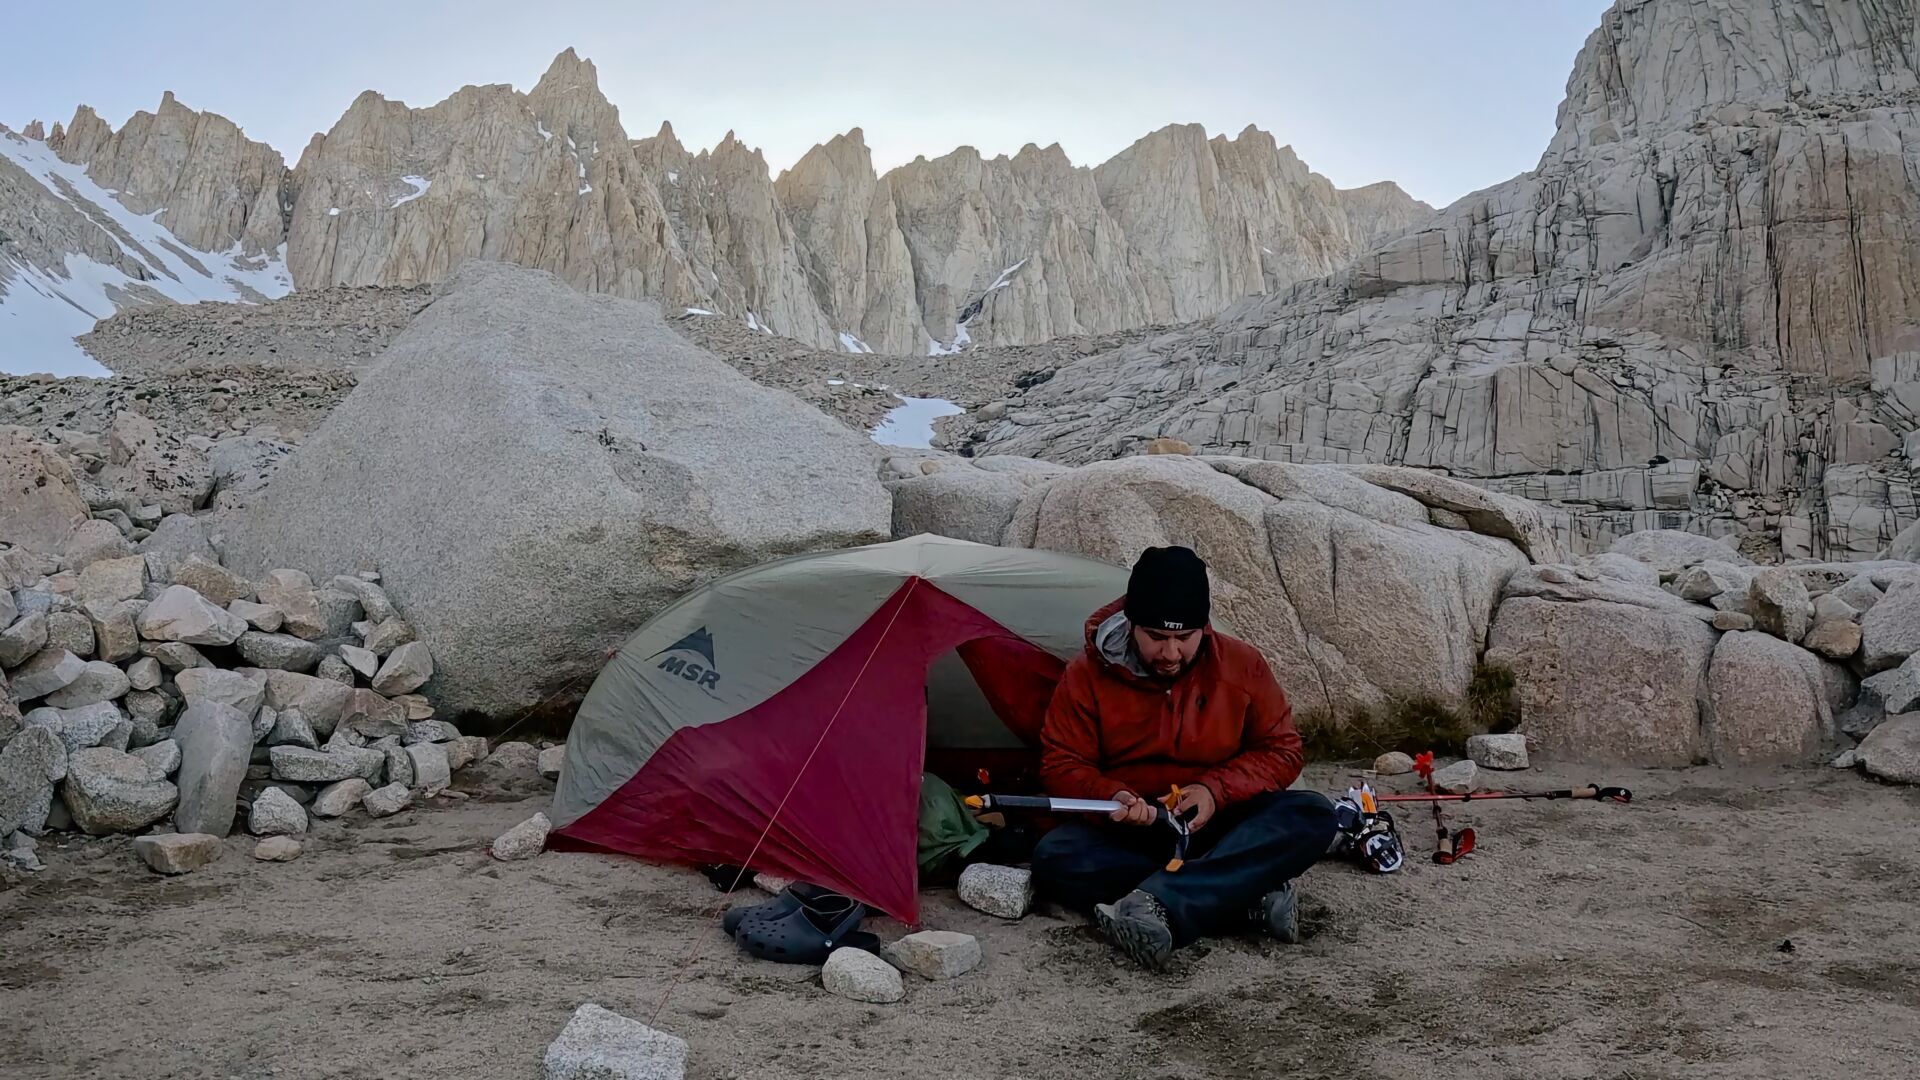
Camping on the Mt Whitney Trail lets you split the hike into smaller chunks, spend a night in the high Sierra, and usually increases your odds of dealing with the altitude successfully. When you fill out your permit form, you’ll choose where you want to camp and on what night. Those choices don’t assign specific tent sites, they’re just general areas. And if conditions change (for example, you’re too tired to continue), you can camp at a different site as long as you follow wilderness rules. Here’s the breakdown of your camping options, along with some suggested itineraries and tips.
| Camp | Distance | Elevation | Notes |
|---|---|---|---|
| Lone Pine Lake | 3 miles | 10000 ft | Technically outside Whitney Zone but overnight permit required |
| Outpost Camp | 3.8 miles | 10400 ft | Wooded area that can get crowded |
| Trail Camp | 6 miles | 12000 ft | Closest to summit push and gets crowded; cold and windy |
| Consultation Lake | ~6 miles | 11700 ft | Tougher access and much quieter |
If this is your first time camping on Whitney, I'd recommend avoiding Consultation Lake. There's not a well-defined trail to the lake. Instead there are several faint unofficial trails just past Trailside Meadow and behind Trail Camp. It's a good option to explore on subsequent trips.
Camping Tips

- There are plenty of established sites to put your tent up. Don't ruin the environment by creating a new one. When you're searching for a site, don't forget to walk back through the site to find spots hidden by walking in just one direction.
- It gets colder than you'd expect. Expect freezing temps at night, even in summer. Bring adequate insulation and layers.
- All of the campsites are by water. Whether the water source is frozen or not is a different issue. You can melt snow if the lakes are frozen. Water should be filtered.
- Bear canisters required: Not for bears up high, but for rodents and birds that will chew through gear. Rent one at the Eastern Sierra Visitor Center if you don't have one.
- WAG bags are mandatory. It's basically a plastic bag that you poop in. You can't dig a hole and bury it up here. You can get them for free at the Eastern Sierra Visitor Center and sometimes at the structure by the trailhead. Dispose of them after your hike in the WAG bag disposal by the trailhead toilet. My advice, try to take care of business at the trailhead before you start your hike.
- On summit day leave your main pack at camp and carry a light daypack to the summit. Secure food in the canister, leaving tents and packs unzipped or open so marmots can inspect them without having to chew through. Packed-up gear is more likely to be destroyed. Another fun fact, sometimes marmots will poop in your tent. Good times.
Get a free California Campfire Permit which is required by the Forest Service if you're using a portable stove.
Gear for the Hike

As you would expect, Mt Whitney is a proper backcountry hike and you need to prepare accordingly. If you're doing a day hike, you need to be prepared to stay overnight. That doesn't mean bringing full camping gear necessarily, because you want to stay light, but things like layers and emergency bivy sacks are appropriate. You can see all the gear that I'm using now on my (unsponsored) gear page. Here's what I bring for a day hike.
- A good headlamp is essential since you’ll likely start before sunrise. Practice hiking at night ahead of time, start with fully-charged batteries, and bring a way to recharge. It's not uncommon to start in the dark and end after dark.

If you hike before dawn you'll see a parade of headlamps, especially when looking down from areas like the 99 switchbacks. - Even in the summer, expect a cold and windy experience as you approach the summit. It can be 80F at Whitney Portal and snowing on the summit at the same time. I bring a puffer jacket, rain shell, gloves, beanie, and long pants at a minimum. Check the summit weather and plan accordingly.
- Cellular connections are sketchy at best. I bring a Garmin inReach with me for SOS. If you do need help, it will likely take hours and maybe even a few days for help to arrive. In addition to the layers I mentioned, I bring an emergency bivy sleeping sack.
- In your preparation for the hike you should already know the ins and outs of the trail, but having electronic navigation tools will help. I carry a paper map and also use a GPX track on my phone and watch. Make sure your battery can handle the long day and that you have a backup battery.
- Eating can be tough at altitude. I try to eat a solid breakfast, then have a Probar or trail mix every 90-120 minutes. When I get higher I'll have a few energy gels ready when I need a boost. If you use electrolytes, bring them as well. Practice your eating and refueling strategy on warmup hikes.
- The good news is that you don't have to carry a lot of water with you, there are plenty of places to refill until you pass Trail Camp. I use a Smartwater bottle, Sawyer Squeeze filter, and a CNOC 2L bladder that lets me refill in just a couple of minutes. I go through about 6 liters of water on a day hike to the summit. I make sure I'm well hydrated before I start to prevent the onset of altitude sickness. There is no reliable water after Trail Camp FYI.
- Trekking poles are standard here. There are enough ups and downs that having poles will help not only on the climbs, but also when going downhill.
- The sun is harsh above the tree-line. Bring your normal sun protection and make sure you have good sunglasses to avoid photokeratitis.
- If there are reports of small snow patches on the trail, you can get away with micro-spikes and trekking poles. If you're going early in the season when whole sections are covered in snow, learn to use more effective tools like an ice axe.
- Bring a Ziploc bag to carry out your trash (food wrappers, etc.) easily.
Essentials I’m Using Now
- Garmin inReach Mini 2: Reliable SOS Everywhere on Earth
- Sawyer + CNOC Water Filter: Easy & Reliable Safe Water
- Nitecore NU25 Headlamp: Running late? Get home safe
- Altra Olympus 275: Favorite trail shoes right now, no blisters and very comfy.
- AllTrails Plus (30% off): Offline maps on your phone with the Plus level
- Full December 2025 Gear List →
Mt Whitney Trail Maps & Planning

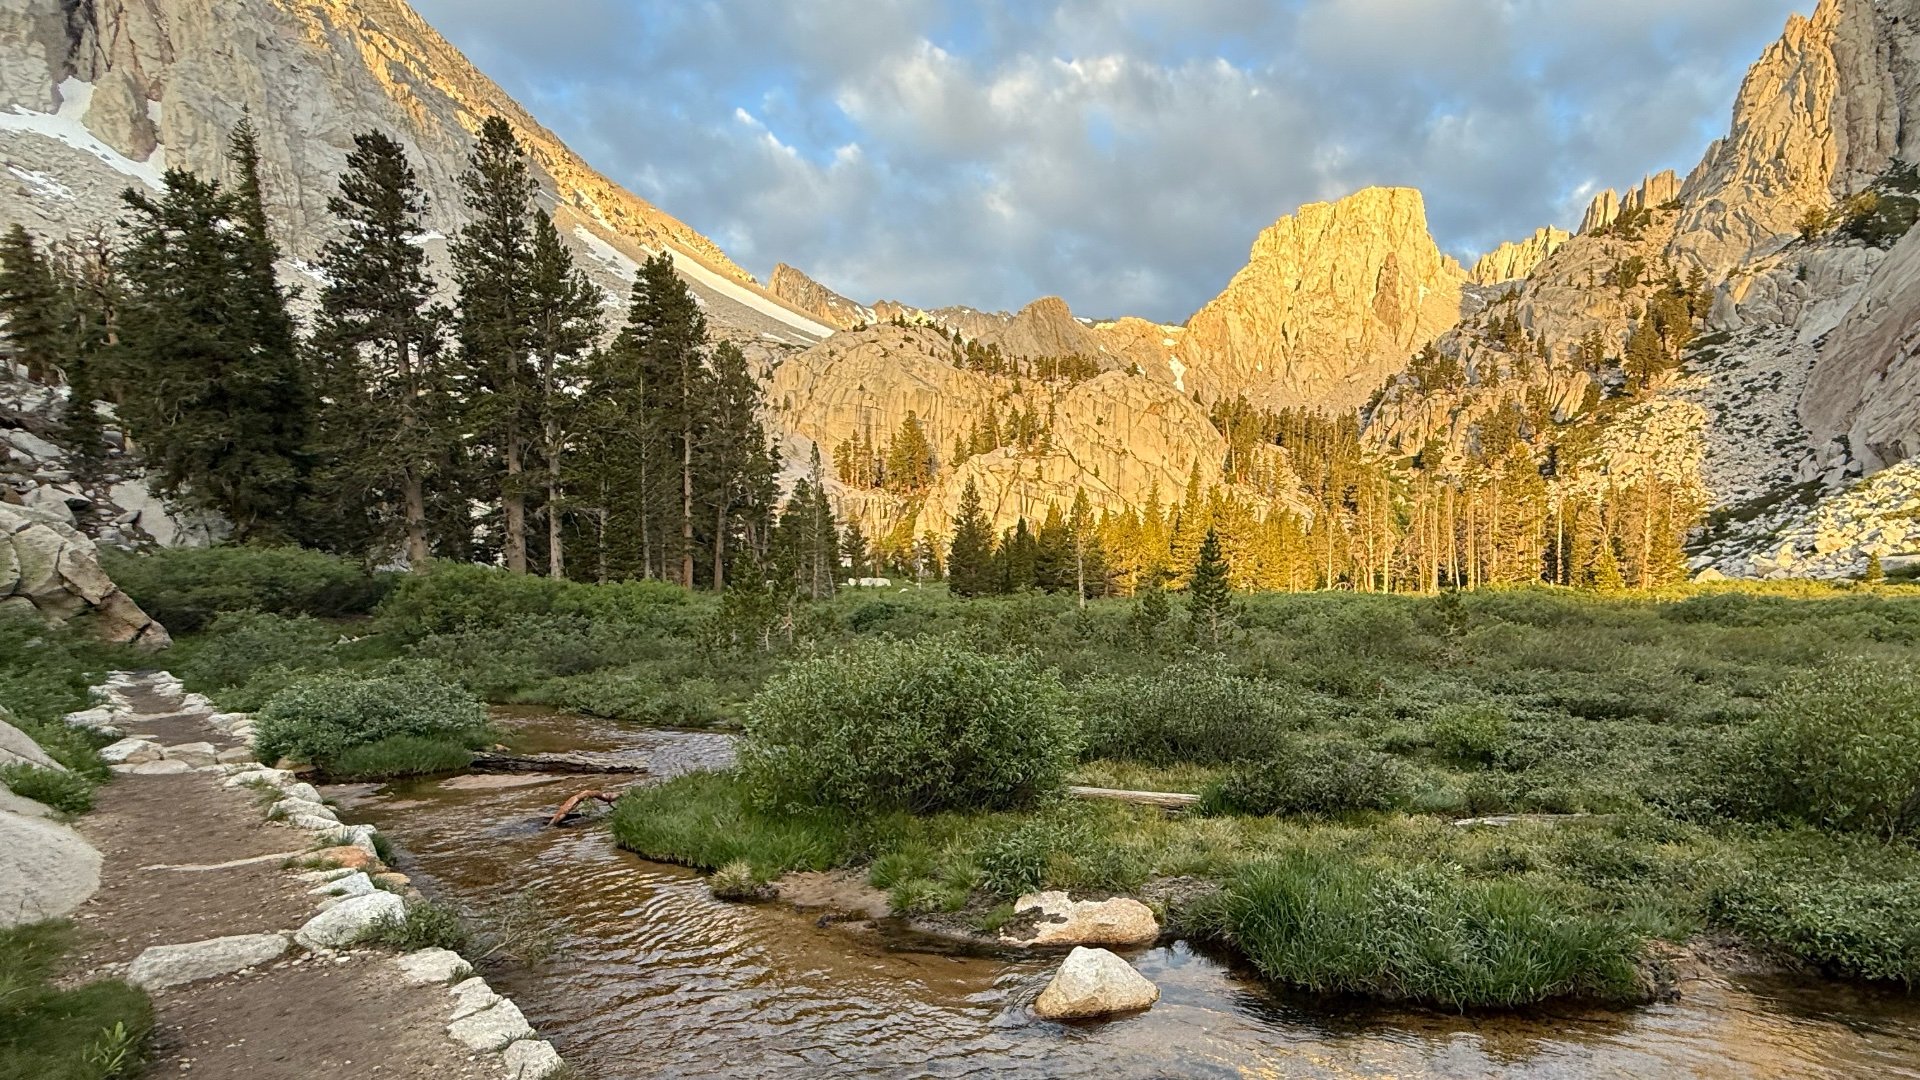
Hiking Mt Whitney is a long day, even for an experienced hiker. It's going to be helpful to not only know what to expect on the trail, but also to break it down in chunks that you can mentally tackle one at a time. Here's how I like to cluster the hike.
- Start → Outpost Camp (0–4 mi / 8,374–10,400 ft)
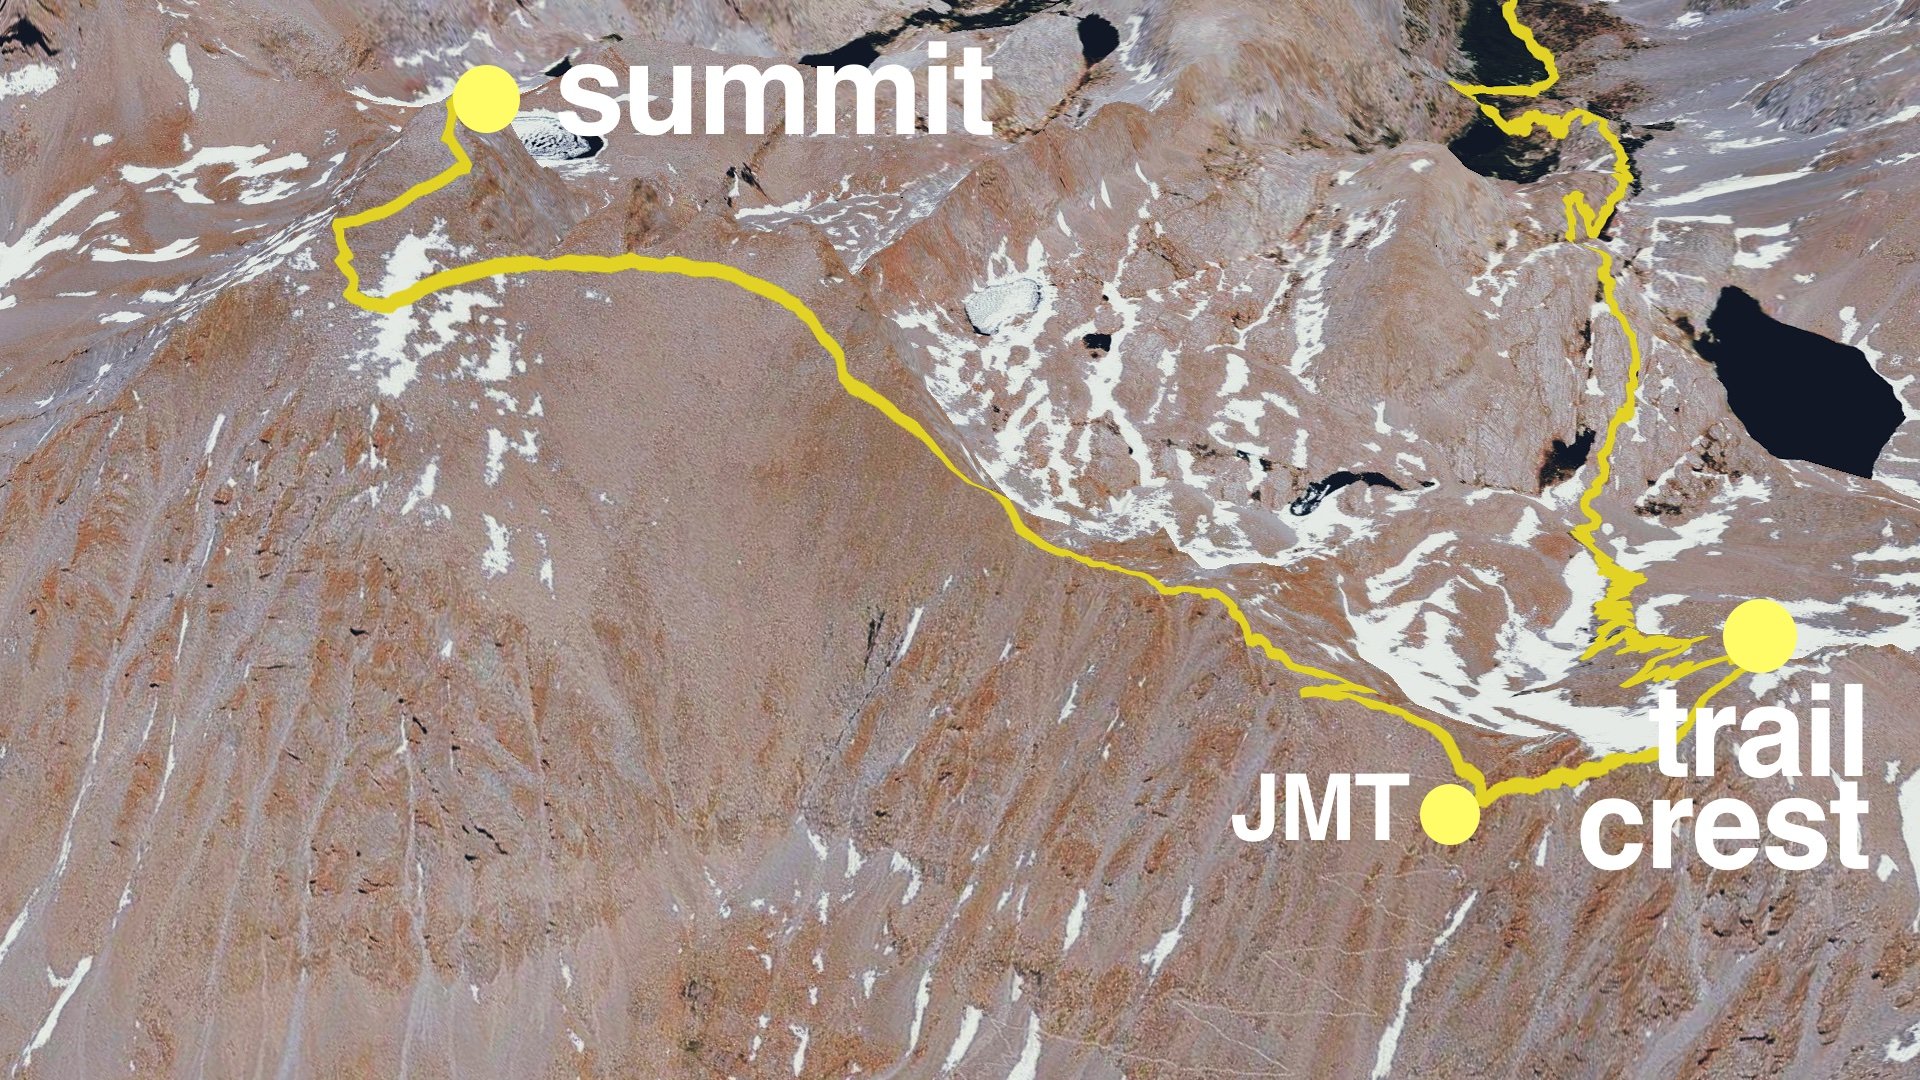
Warm-up for higher altitude, plenty of tree cover. I will do a gut check on my pace versus my expected pace along this section. - Outpost → Trail Crest (4–8.5 mi / 10,400–13,645 ft)
Trail gets steeper and exposed. Good place to do gut check on the weather and how you are feeling. - Trail Crest → Summit (8.5–10.7 mi / 13,645–14,505 ft)
Exposed trail along ridge to summit. Generally takes longer than expected because of the altitude. I do a gut check here on how my body is feeling and whether I can make it to the summit feeling good enough to hike back safely.
Hike Landmarks
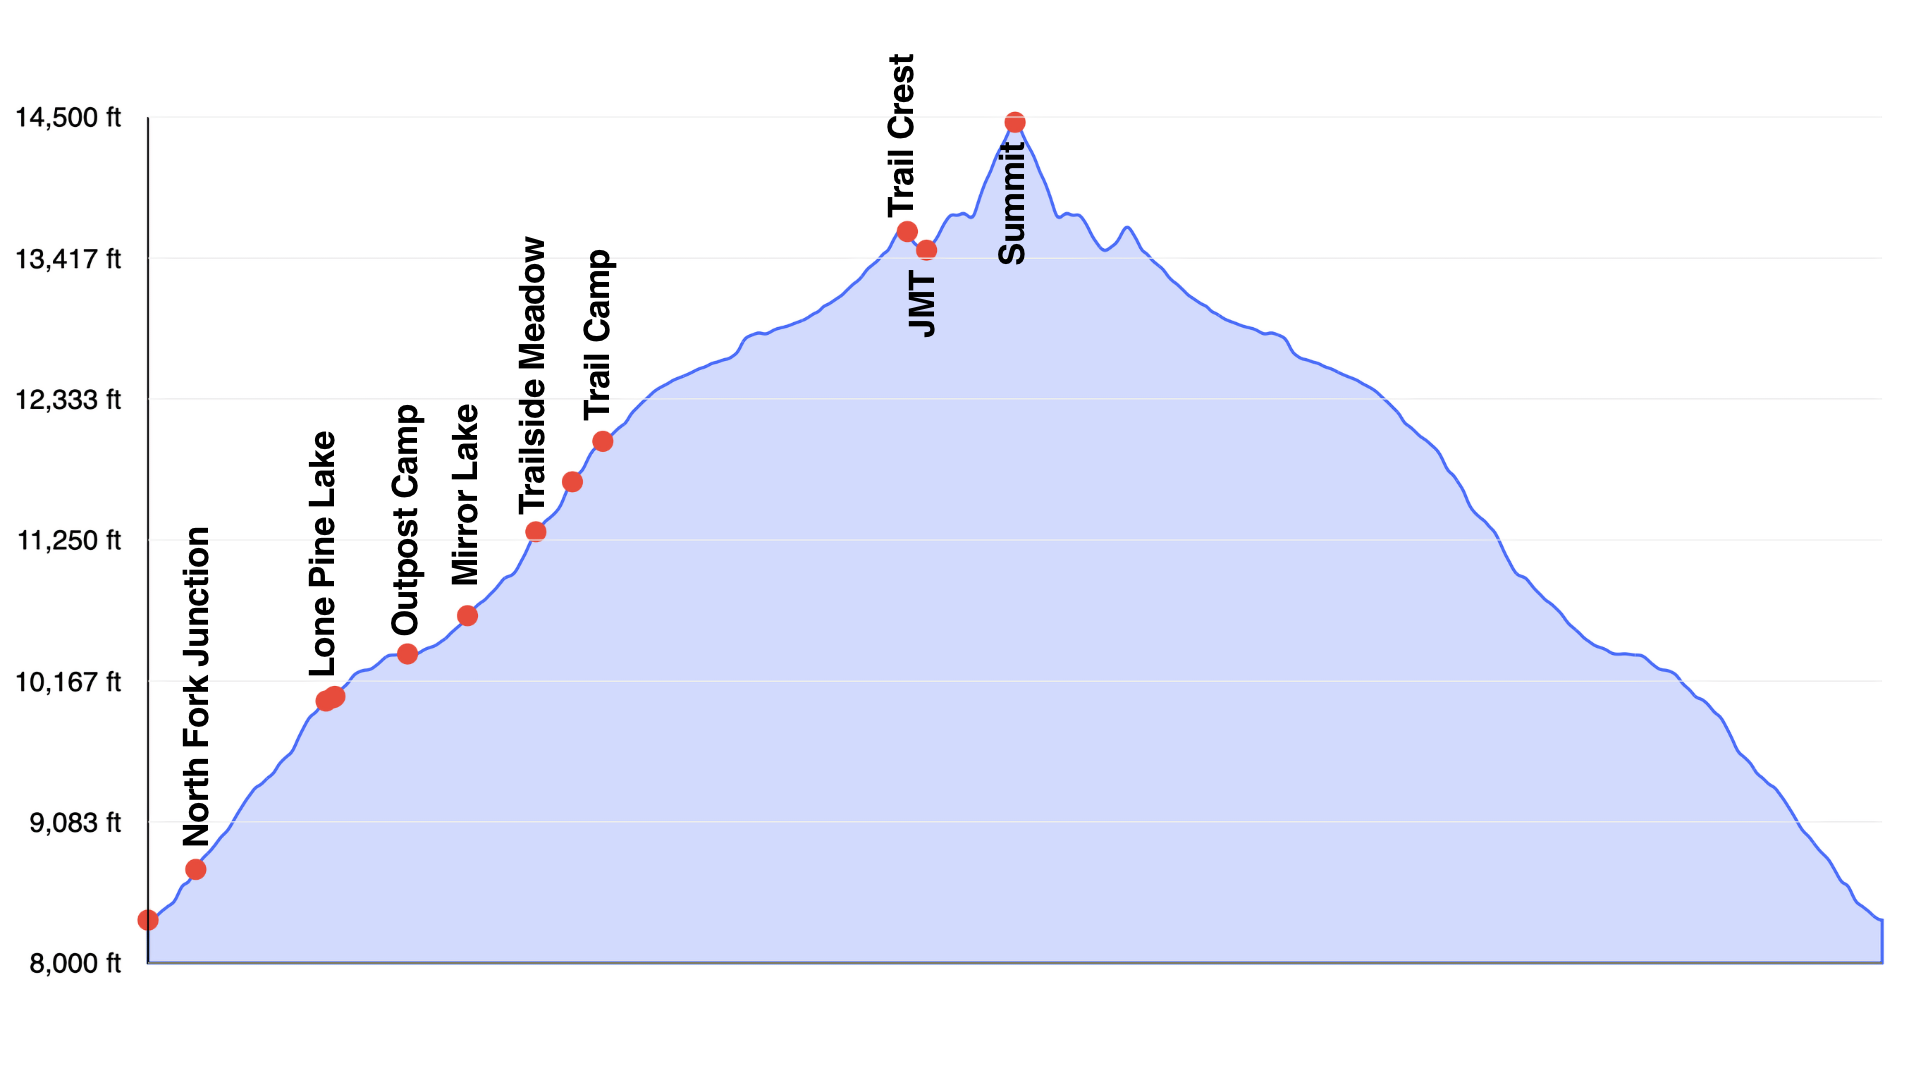
| Landmark | Approx.Distance | Approx.Elevation | Notes |
|---|---|---|---|
| Trailhead | 0 | 8374 | |
| Mountaineer Turnoff | 0.75 | 8900 | |
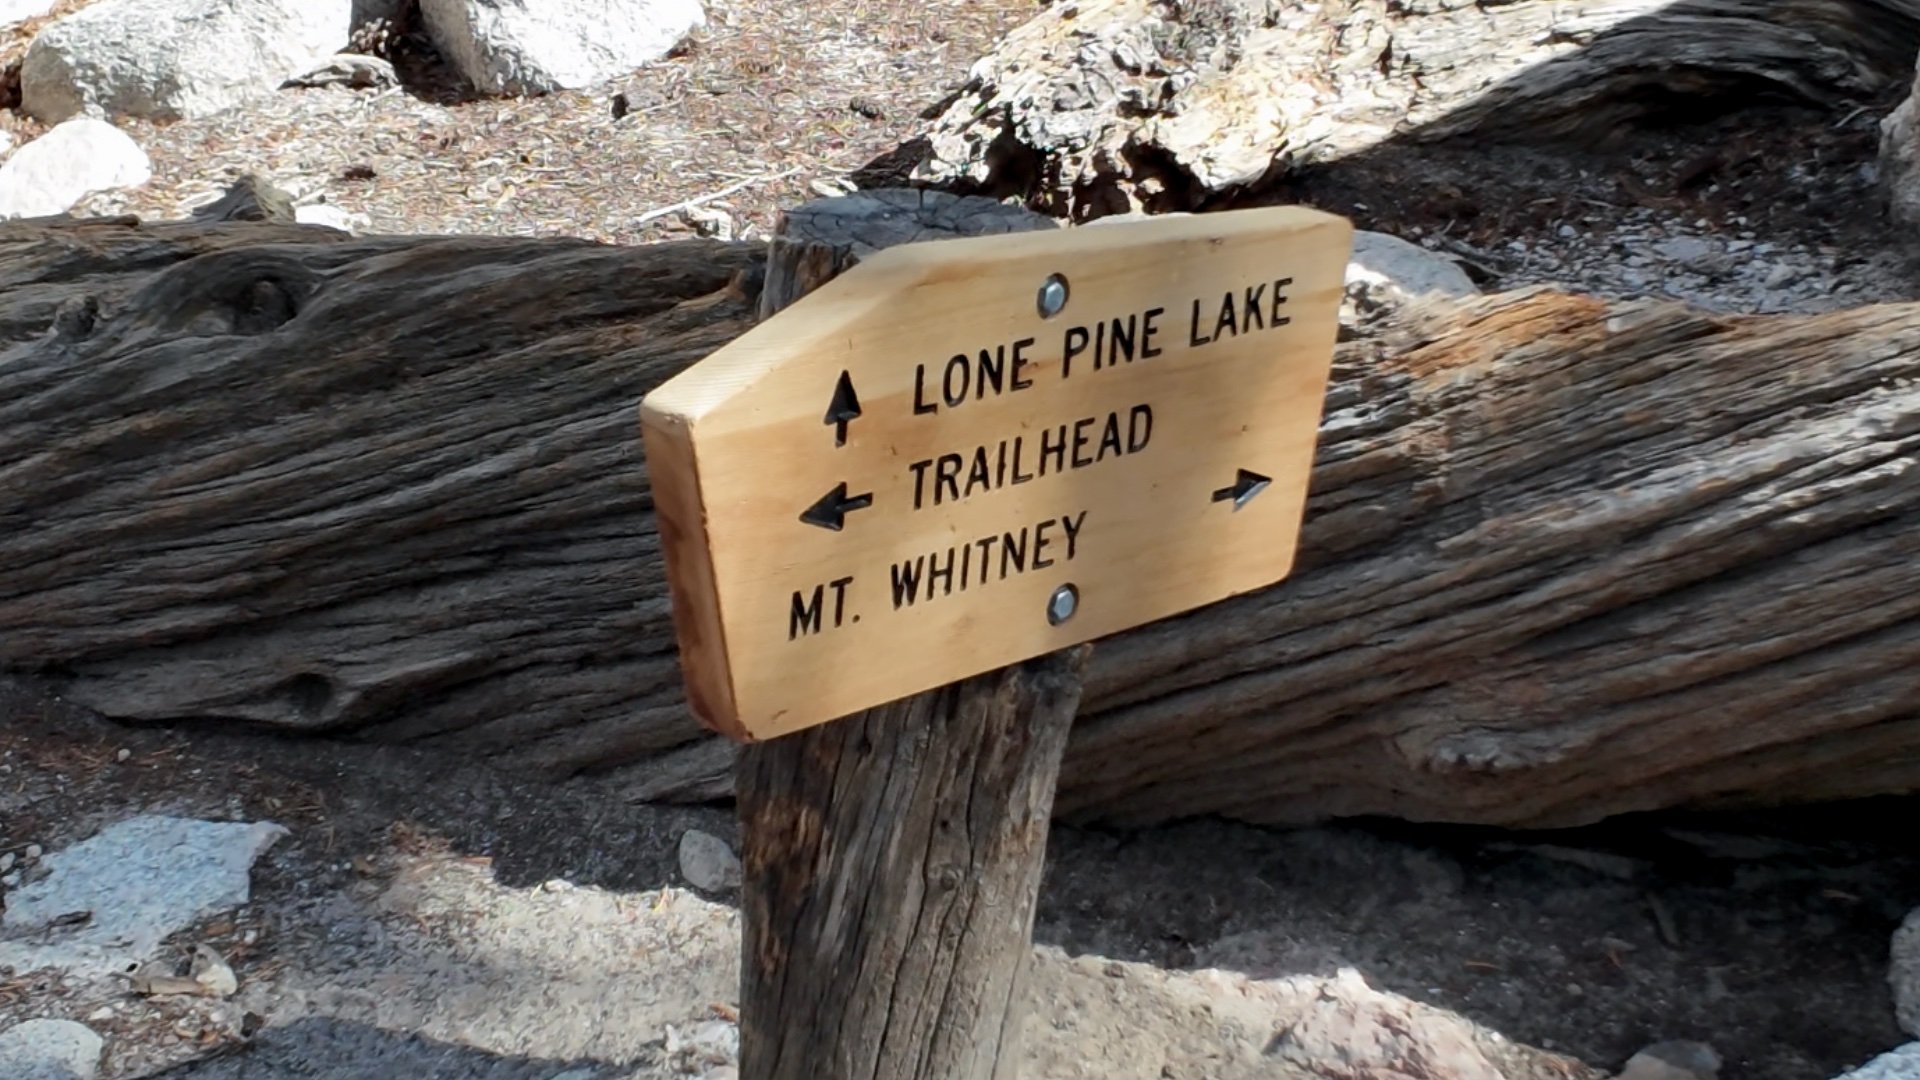
| Lone Pine Lake Junction | 3 | 10000 | |
| Outpost Camp | 4 | 10400 | Gut check on pace → still on schedule? |
| Mirror Lake | 4.5 | 10800 | |
| Trailside Meadow | 5.2 | 11300 | |
| Trail Camp | 6.5 | 12000 | Gut check on weather → storm clouds forming? snow? |
| Trail Crest | 8.5 | 13645 | Gut check on body → altitude sickness? too tired to return safely? |
| Summit | 10.75 | 14505 |
Pace Calculator

I created a timing spreadsheet that breaks the Mt Whitney Trail into key landmarks with distances, elevation, and your estimated pace. Plug in your uphill and downhill speeds, and it calculates elapsed time and expected time of day at each point so you can plan breaks, gut checks, and a safe turnaround.
Some tips:
- People generally go uphill at about half the speed they go downhill. On Whitney, where the air is thin, it can be even slower. Overall it makes sense to be conservative on your pace estimates. Better to estimate slower and finish early than to go slower than you thought and finish after sunset. Use your training hikes as a baseline.
- Most people start their hikes between 2am and 5am, and finish in somewhere between 12-16 hours.
- Ideally you'll reach the summit by noon to avoid afternoon thunderstorms, although they can appear anytime.
Mt Whitney Trail Maps
 View Interactive Map
Be careful. Some mapping platforms show old trails or show mountaineering routes as hiking trails. The information I've shared here is all vetted by me and is the Class 1 trail that you can hike safely to the summit of Mt Whitney.
Elevation Profile
Staying Alive

Some factors on Mt Whitney are beyond your control. Weather, altitude, and trail conditions don’t care how hard you trained, how lucky you were in the permit lottery, or how much your trip cost. Hikers who ignored these realities have lost their lives on the Mt Whitney Trail. The key is knowing the risks ahead of time, working to mitigate them, and being willing to turn back if things aren’t right.
Dealing With Altitude

There are two big challenges when it comes to altitude on Whitney.
- With less oxygen in every breath, your body has a harder time turning glucose and fat into usable energy, so you feel tired much sooner than you would at sea level.
- The lack of oxygen can trigger altitude sickness. Sometimes it’s just a mild headache or nausea, but in severe cases fluid can build up in your lungs (HAPE) or your brain can swell (HACE). Both are can kill you if you don’t turn around immediately.
Less Oxygen

The air on Mount Whitney has 20.9% oxygen, just like it does at sea level. The difference is that the air pressure drops as you climb, so every breath has fewer oxygen molecules in it. At 14,505 feet you’re only getting about 57–60% of the oxygen you would at sea level. It’s like working out with one nostril plugged, you’re breathing, but you’re not pulling in nearly as much oxygen.
The good news is that there are things you can do to help your body use oxygen more efficiently and minimize these effects.
- Be fit. Training ahead of time helps your body use oxygen more effectively.
- Spend time at altitude. Your body will “acclimatize,” it adapts by producing more red blood cells and changing how it uses oxygen. The itineraries I shared earlier address this.
- Stay hydrated. Being even a little dehydrated makes altitude harder, and the symptoms can feel a lot like AMS. Drink plenty the day before, start your hike topped off, and keep sipping along the way. That said, don’t force down gallons of water, over-hydrating can be dangerous too. Aim for steady, balanced hydration and skip the alcohol the night before.
- Use quick fuel. At altitude your body struggles to break down complex foods. Simple carbs, like energy gels, are easy to process and give you a quick boost when you need it most. Most also have electrolytes in them. I get the ones that also have caffeine.
- Consider Diamox. This prescription medication (acetazolamide) actually helps your body acclimatize faster. Some hikers take it starting the day before climbing, but it’s a talk-to-your-doctor thing, not something to experiment with on the mountain.
- Ibuprofen can help. Studies in the Sierra found that 600 mg doses, taken a few times a day, can reduce AMS headaches and mild symptoms. It won’t prevent serious altitude illness, but it can take the edge off. I've found this works well personally, but everyone is different.
Altitude Sickness: When to Turn Around

Every year I see hikers shrug off altitude sickness like it’s just another sore muscle or blister. It’s not. This isn’t a marathon with aid stations and ambulances; up here the consequences can be serious, even deadly.
First off, there are some normal symptoms that are uncomfortable but not life-threatening. This is considered mild AMS (Acute Mountain Sickness):
- Headache – dull and manageable at first, but if it sharpens or intensifies, you’re moving into the danger zone.
- Swelling of hands or feet – common at altitude and usually harmless.
- Lightheadedness or dizziness – mild at first, but if it worsens, take it seriously.
- Mild nausea or loss of appetite – common early signs.
- Poor sleep when camping – almost everyone deals with this when overnighting on the Whitney Trail.
If any of these symptoms progresses to a point where it's too hard to hike because of it, you need to stop and take a break. Stop, drink, relax, and see if the symptoms subside. If they stay the same or get worse, hike back downhill and take another break, then reevaluate.
If things progress beyond that, here’s what to watch for:
- Vomiting or severe headache – a sign AMS has moved beyond “mild.” Danger: you won’t keep fluids or food down, and dehydration makes things worse.
- Extreme fatigue – if you’re too tired to continue safely, that’s a red flag. Danger: exhaustion plus altitude means mistakes, accidents, or collapse.
- Loss of coordination (stumbling, staggering) – this is a hallmark of HACE, where your brain is swelling inside your skull. Danger: poor balance and judgment lead to falls, confusion, or wandering off trail.
- Confusion, slurred speech, hallucinations, strange behavior – another HACE red flag. Danger: your brain is no longer working properly, and you may not recognize how sick you are.
- Persistent cough, shortness of breath at rest, gurgling or wheezing – signs of HAPE, where fluid builds up in your lungs. Danger: your body can’t absorb enough oxygen, even when you stop to rest. Left untreated, HAPE can be fatal in hours.
- Blue lips or fingernails – advanced HAPE, meaning oxygen levels are dangerously low.
The bottom line: mild headaches and poor sleep are common, but once symptoms hit the lungs, balance, or brain, you’re in life-threatening territory. The only cure is to descend. This may sound like a standard disclaimer, but every year I hear from readers with stories like this:
On my first Whitney climb, a man approached us saying his girlfriend was in bad shape in their tent. When we checked, she had severe AMS symptoms and couldn't move. A helicopter had just landed nearby to evacuate someone with a heart attack, and we realized that if she didn’t get on it, she wasn’t going to make it. We carried her the quarter-mile to the chopper, and just as we arrived, her boyfriend collapsed. The rescue crew squeezed them both on board and flew off. I never found out what happened to them.
Check out the Instagram feed of Inyo Search and Rescue to learn more about what to expect in a rescue and how others got to the point where they needed it.
Warning at trailhead: SAFETY IS YOUR RESPONSIBILITY. Rescue is NOT guaranteed.
Bad Weather

Weather is out of your control on Whitney. Even in summer you can get snow, hail, or storms that build in minutes. If that happens, the only safe move is to turn around and get lower to safety.
Lightning is the biggest danger. Hikers have been killed on the summit, including inside the stone hut. The hut has lightning rods and grounding, but that won't necessarily save your life. The rule is simple: if you hear thunder or see clouds building quickly, head down quickly (but also safely). To make things more complicated, military jets will often fly in this area, sounding like thunder, so confirm that it's actually thunder before turning around.
Just four days after the trail first opened in 1904, a U.S. Fisheries employee was killed by lightning on the summit!
Here's what I recommend to avoid having weather stop your summit attempt.
- Check the mountain weather for Whitney and know what to expect.
- Leave as early as possible. Thunderstorms can happen any time, but in general they happen later in the day. I try to hit the summit and be off before noon as a rule of thumb.
- Lightning can hit anywhere, but in general being below the tree line is your best bet. Today experts say don't wait it out, just move as quickly as you can to a lower point (around Outpost Camp or below makes sense).
- Keep your eyes open for small clouds building into larger ones over the peaks in the morning. And of course the standard quick bubble-up of Cumulonimbus clouds (thunderheads) is another obvious sign.
- Always bring a shell and rain pants.
- As I mentioned earlier, snow and ice can up the danger considerably. People slip, fall and die here, even when "just hiking."
More Tips to Stay Safe

- Check recent trip reports on AllTrails, the Mt Whitney Facebook Group, and Whitney Zone to know what to expect. If you stop at the Eastern Sierra Visitor Center, ask the ranger for the latest updates. Having a clear picture of what to expect makes a big difference.
- Getting to the summit is only half the hike. You still have about 11 miles back to Whitney Portal, and I’ve seen plenty of folks blow all their energy on the climb up and then struggle badly on the way down, finishing long after dark. Pace yourself, eat and drink along the way, and don’t push past your limits. Hikers have died on the descent after becoming too exhausted to follow the trail and making a wrong turn.
- Always leave your plan with someone at home and tell them when to expect your call. If they don’t hear from you, they should call the Inyo County Sheriff’s Office (760-878-0383) right away, they don’t need to wait 24 hours. The best option is to carry a satellite communicator that drops breadcrumb tracks and lets your family follow your progress and message you during the hike.
Going to the Bathroom

Here's the deal. You should try to pee on rocks or durable surfaces, and you have to carry your poop out. There used to be toilets at the summit, Trail Camp, and Outpost Camp, but they were removed years ago. So if you have to go, you go in a WAG bag, a larger version of a dog poop bag for humans. Some pointers below:
- There are different versions of WAG bags, some are fancier, some are simply a plastic bag.
- WAG bags come with a small amount of toilet paper and a hand wipe, I bring extra toilet paper and hand sanitizer just in case. It barely weighs anything.
- You can get them for free at the Eastern Sierra Visitor Center and sometimes at the trailhead structure. If you want to be safe or make sure you have a quality one that's easy to use, buy the "Toilet-To-Go" ones online, which seem to work the best for me.
- Bring one for every day you are out, even on a day hike. Play it safe.
- At one point there were shelters where you could install your WAG bag and sit over it, but those are gone thanks to the Wilderness Act. So if you do have to poop, you have to find a spot behind some trees or boulders. Either put the bag on the ground and hold the sides open with rocks (so it doesn't blow away), or just hold it up and over your butt.
- When you're done, throw the toilet paper in there, close it, and store it in an external pocket on your backpack. Good WAG bags have chemicals in a 2-bag system to keep the odors trapped.
Mt Whitney Trailhead


The road to Whitney Portal is closed in the winter and occasionally closed because of damage, check the Inyo County road closure page before heading out.
If you have time, visit the Whitney Portal Trailhead during daylight. You’ll see where the hike begins, sort out parking, and take some of the stress out of arriving in the dark on hike day.


The parking lot by the pond used to be day-use only. I think today it's park wherever you can.

Don’t worry about bears on the trail, but do in the parking lot. They’ve broken into cars for food, gum, even toothpaste. I’ve seen interiors torn apart firsthand. Rangers patrol and will tag cars with scented items left out, so use the bear boxes in the lot.

Can you sleep in your car before the hike at Whitney Portal? Yes.


Route Overview: Step-by-Step Directions

The Mt Whitney Trail doesn’t have many junctions, but it’s a long haul, and breaking it into chunks makes it easier to manage. I think of it in three parts:
- Start to Outpost Camp: gentle climb through trees, a good spot to check your pace.
- Outpost to Trail Crest: steeper and more exposed, check the weather and how you’re feeling.
- Trail Crest to Summit: high and slow along the ridge, where you need to be honest about whether you can make it up and back down safely.
Start to Outpost Camp

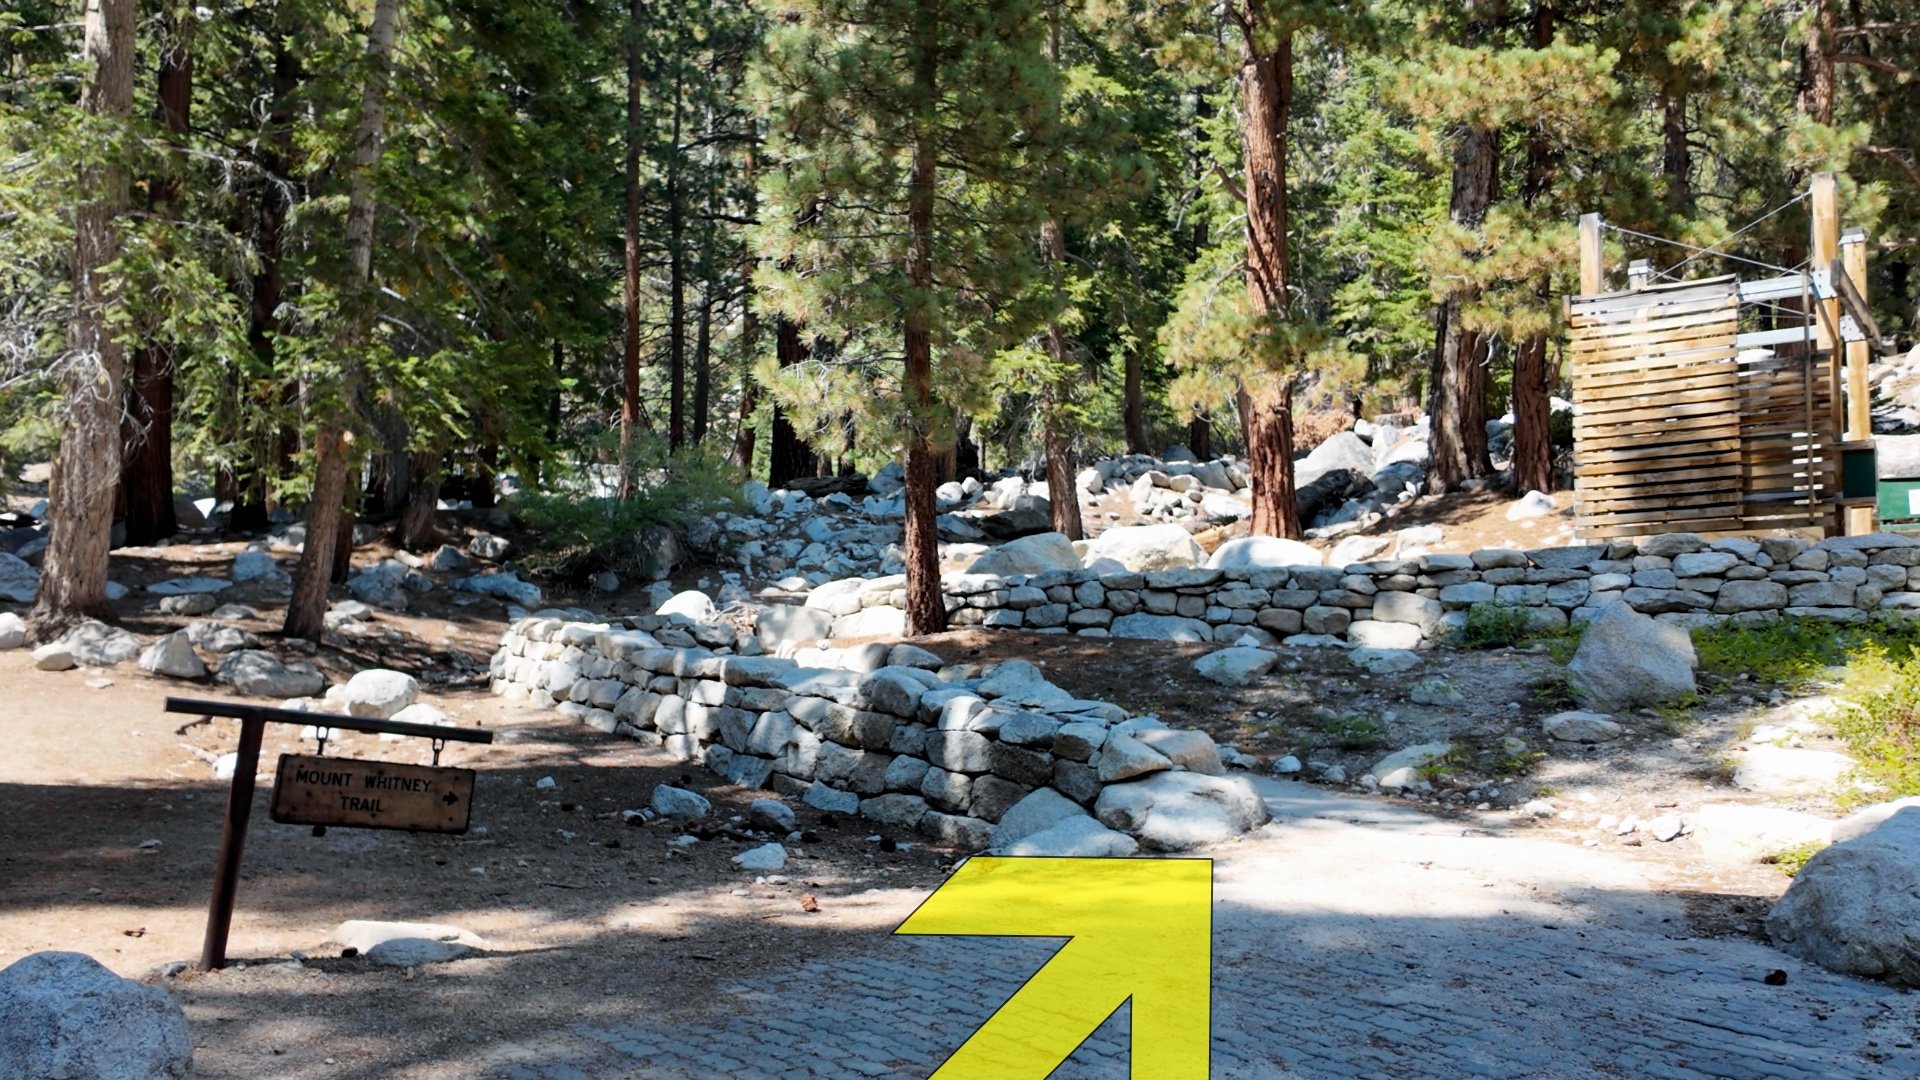

While the trail has been modified over the years, it was originally built in 1904 by engineer Gustave F. Marsh. Designed to handle pack animals like mules, it was used that way until 1972, much like the mule trails in the Grand Canyon. Since its construction, it’s estimated that around 1.5 million people have hiked the Mt Whitney Trail.

Try to pace yourself. Don't start too quickly. Steady wins the day here.


Fun fact: The John Muir Wilderness contains the biggest uninterrupted stretch of land above 10,000 feet in the lower 48.


This is a good place to eat something. Try to fuel up here and Trail Camp, which are both flatter areas where eating and moving at the same time are easier.


From the 1930s into the early 1970s, Outpost Camp had a commercial tent camp where visitors could ride in on mules, then book a bed and a hot meal while the animals grazed in the nearby meadow. Today you can still do mule-supported trips to Whitney via Horseshoe Meadows on the west side of the mountain. While mules will carry your glamping gear to the campsite, you still have to do the day hike from Guitar Lake to the summit yourself.
Outpost Camp to Trail Crest

This is a good place to assess your pace. Are you on target? How’s the weather shaping up? How’s your body feeling, knowing the hardest sections are still ahead?

According to the USGS, there are 144 officially named ‘Mirror Lakes’ in the USA.


Consultation Lake was named in 1904 when trail builders were using this spot to decide how to route the trail to the ridge 2000 feet above.

There's no reliable water source past Trail Camp, so fill up here for the final push. In normal conditions I'll usually bring 2L from here.

If you are continuing to the summit, don't linger at Trail Camp too long. The weather can change quickly and sitting around can make you stiff.


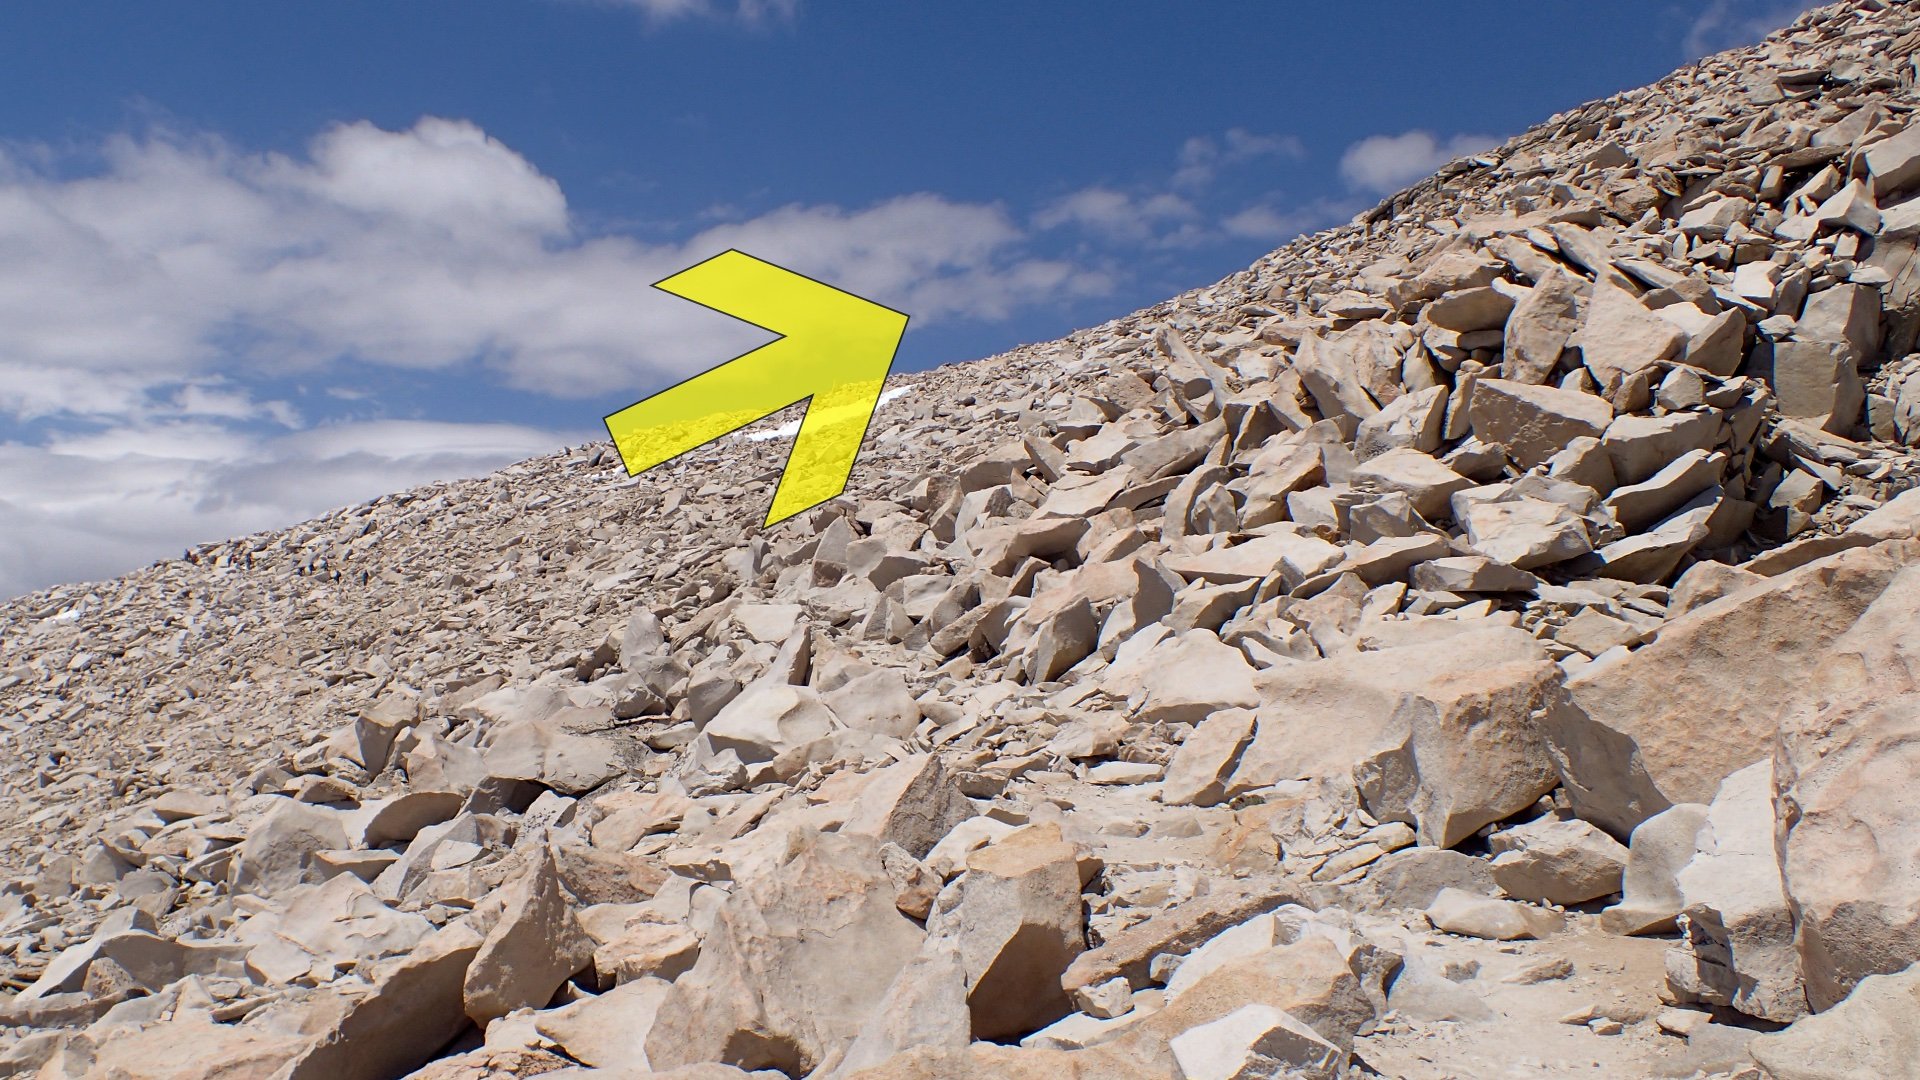
How many switchbacks are there really? It depends on how you count the turns in the trail. Generally a switchback is a turn that completely reverses direction. If you count those, it's 97. When you add in a few "maybe" turns, it's 99.


Trail Crest Pass is the highest (official) trail pass in the United States.
Trail Crest to Mount Whitney Summit
Now is the time to have a sober and conservative check-in. How’s your body handling the altitude? Do you have the energy for the long descent? Is the weather holding? If any answer is no, this is the smart place to turn back.


The backpacks you see here are from JMT hikers who drop their heavy gear here before making the final push to the summit.

The altitude can make this section a challenging slog for some folks (myself included). As you push toward the summit, ponder the fact that in 1926 there were plans to build a cable car to the summit, where riders would be greeted with a 40-room hotel!


Want to hide in the hut? While it can provide shelter from wind or bad weather, and it does have lightning protection, it’s not safe in a lightning storm. Hikers inside have been injured when lightning struck the roof.

Returning to the Trailhead
The descent from Whitney always feels longer than it should. By the time you’ve bagged the summit, you’ve already put in an epic day, and now you still have about 11 miles to go. This is when mistakes happen and when you need to stay extra sharp.
- Step carefully on the way down. Fatigue makes it easy to roll an ankle on the rocky trail.
- Use trekking poles to take pressure off your knees and steady your balance.
- Be careful not to turn down the JMT as you hike back toward Trail Crest. That probably sounds unlikely as you sit here reading this, but when you're tired on the trail, it can (and has) happened.
- Likewise, the descent from Trail Crest to Outpost Camp can be tricky, especially on the granite slab sections. Use your electronic navigation here to make sure that you're in the right place.
360 Video
I shot the trail guide as a 360° video so you can get a feel for what it’s like to hike it yourself. You can look around in any direction, just like if you were on the trail.
How to watch:
- On desktop: click and drag the video with your mouse.
- On phone or tablet: move your device around or swipe the screen.
- If you’ve got a VR headset, open the video in the YouTube app and hit the VR icon for the full effect.
- You can replicate a VR headset by putting your phone in an affordable VR viewer.
A Big Thank You
This updated guide almost didn’t happen.
I had reached out to the Forest Service to ask about permit options that would let me film over multiple days. They preemptively told me I wasn’t allowed to shoot any video at all, because Mount Whitney is in a Wilderness Area and they deemed me a “commercial enterprise,” which they said disqualified me from filming there.
This was despite the fact that others, including obvious commercial enterprises like CBS and the LA Times, had done the same without issue. Their decision seems like a clear violation of my First Amendment rights, selective enforcement of the rules, and inconsistent with the Wilderness Act itself, which explicitly allows for the creation of educational content. It also directly contradicted National Park Service guidelines, which say someone like me, hiking solo with a GoPro, is allowed to film in a designated Wilderness Area.
The workaround was this: I was able to use footage from others. And that’s where the community stepped up. I would not have been able to produce this guide without their generosity and support.
All the information in this guide is based on my many hikes up Whitney, including this year, but the media, which I was told I couldn’t share my own, came from others. So a huge thank you to everyone who helped make this guide possible and, hopefully, helped make the journey safer for others.